
1. Introduction
A well-designed wardrobe can go a long way in adding convenience to your everyday life, utilising space effectively and obviating the need to buy additional furniture. This post takes a thorough look at 4 key aspects you must keep in mind when selecting or designing a wardrobe:
- Build materials for wardrobes
- Wardrobe shutter options with their pros and cons
- Designing wardrobe internals – shelves, drawers and fittings
- Make vs buy – get one custom-made or buy a readymade one from a store
2. Pre-requisites for designing or selecting a wardrobe
Before you even start thinking about your wardrobe design, you must conduct a space planning exercise for your room. By the end of that exercise, you should be clear on the following 4 things:
- Purpose of the room
You must be clear about the purpose of the room. Will it be used just for sleeping, or do you plan to work there as well? Would you also use the bed for playing with kids, working on your laptop or simply lazing around? Answers to these questions will influence the design/size of your bed, choice of other furniture items and storage needs of the room.
- Storage groups for the room
All items related to the purpose of a room should be in that room itself. List them down, categorise them into groups and estimate if any of these groups would grow significantly over time; this will help you allocate space accordingly. This exercise is tedious, but it ensures that you subsequently have the right furniture in the room as well as the right balance of hanging rods, shelves and drawers in your wardrobe.
- Mandatory vs optional groups
Identify which storage groups need to be that room come what may, as opposed to those that you could consider keeping elsewhere in the house. This exercise will help you prioritise in case you are subsequently forced to choose between groups because of limited space.
- Position(s) of the wardrobe(s) in the room
This is crucial as you need to know the overall storage space available, as well as how it would be split across wardrobes/cupboards. This would in turn help you group relevant storage groups into the right furniture.
3. 4 aspects to consider in wardrobe design
The concepts I have discussed below are equally applicable for wardrobes and cupboards, so I shall be using the words wardrobe and cupboard interchangeably.
3.1 Wardrobe carcass material
The carcass is the part of the wardrobe without the shutter. The material used for building the wardrobe carcass ranges from solid wood, plywood, HDF, MDF to particle board, with wood being the strongest and most durable, and particle board being at the other end of the spectrum.
Solid wood wardrobes were the most preferred 50 years back, but they are rare today given that good quality wood is expensive and there are several alternatives available today.
Plywood is durable, can handle rough use over the years and is typically used for large wardrobes that extend right from the floor to the ceiling. However, plywood doesn’t have the versatility of wood as you cannot create intricate carved designs on its surface.
Fibreboard is manufactured by mixing wood fibres with resins and wax and compressing them under high heat to create sheets that have a smooth finish. The biggest advantage of fibreboard is that since they are machine-made, the machines can be programmed to generate boards of any shape with a variety of intricate designs on its surface. Fibreboards can be finished with a wide variety of coatings using machines, thereby making the finished product visually appealing.
Fibreboards come in 3 types, based on the quality of bonding and pressure used to manufacture them. High density fibreboard (HDF) is the best among them, followed by medium density fibreboard (MDF) and Particle board (PB) in decreasing order of cost, strength and durability.
HDF ranks after plywood in terms of strength and is better suited for cupboards that are used less often, while MDF is better suited for smaller cupboards that are used occasionally. It’s better to avoid particle board for large and medium sized furniture pieces as they don’t last beyond a year or two, and you end up spending more in the long run buying replacements.
Wardrobes fixed to the wall are typically a one-time purchase; so it’s better to opt for something durable.
3.2 Wardrobe shutters
You can have 2 types of shutters for your wardrobe, each has its own pros and cons:
- Swing shutters
- Sliding shutters
3.2.1 Swing shutters
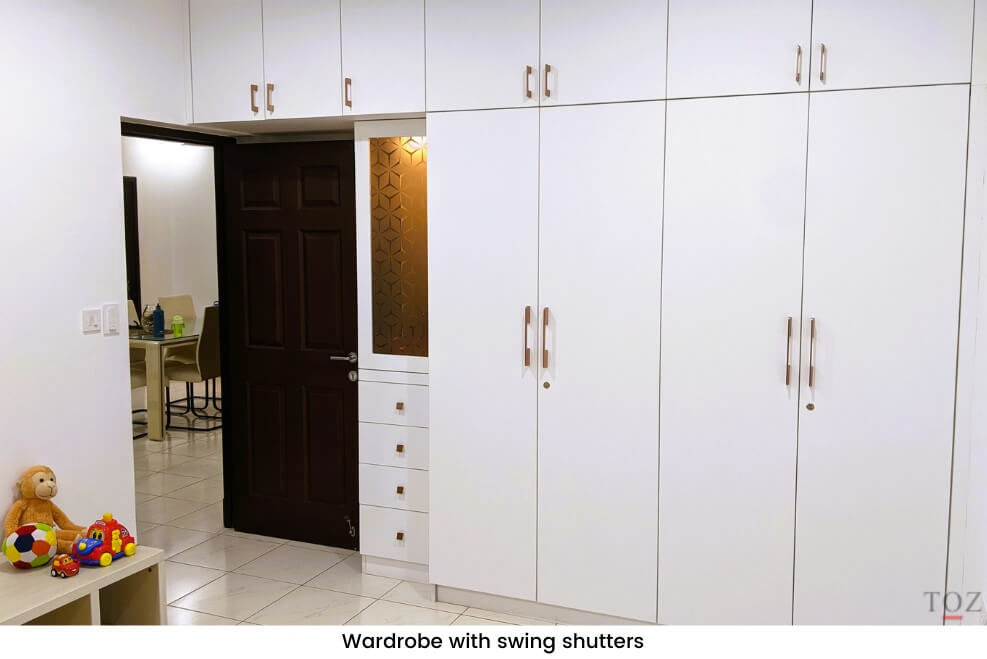
Swing shutters (or hinged shutters) are the classic style shutters that are fixed on 2-4 hinges on the side and swing open outward.
3.2.1.1 Shutter material
Blockboard is the best material for making swing shutters. It is lighter than plywood, sturdy and doesn’t bend over time. It is manufactured by placing softwood strips (preferably pine wood) between 2 layers of wood veneer and applying high pressure.
Plywood is avoided for making shutters as it is heavy and long pieces of plywood have a tendency to bend a little (2-3mm) with changes in weather.
After blockboard, fibreboard (HDF/MDF) is a popular material used for shutters as it doesn’t bend over time. However, with frequent usage of the shutters, the wood fibres tend to disintegrate near the screws, the hinges loosen and cannot be fixed back again. I generally don’t recommend fibreboards for high usage furniture, but if you are really keen, stick to HDF. Avoid MDF and particle board shutters, they just don’t last.
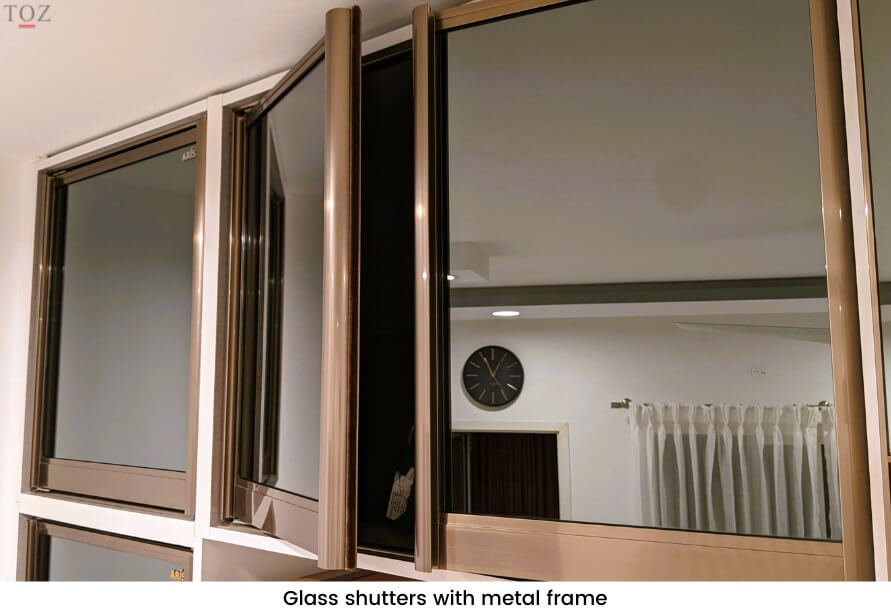
You can also opt for glass shutters encased in a metal frame, but make sure to check that there are no sharp metal edges.
3.2.1.2 Shutter surface material
Laminate, veneer and duco paint are the most popular materials used on the surface of shutters.
Laminate is the most economical and scratch-resistant of the 3. However, in the rare case that it does get scratched due to some sharp item (like a metal piece) brushing against it, then the entire laminate sheet needs to be replaced, which can be quite expensive. Laminate is sold as large sheets of thicknesses varying from 0.8mm to 1.5mm. 1mm thickness is the most common while 1.25mm and 1.5mm fall into the premium segment.
Avoid using 0.8mm thickness laminates as they don’t stick evenly on a surface and tend to form bubbles.
Veneer and duco paint cost more but render a unique look to the wardrobe. Although they get scratched easily, a quick repolish or touch-up is all it takes to get them looking as good as new. However, you will need to call a specialist to get this done. As these materials get scratched easily, consider applying a transparent protective coating of PU (polyurethane) on top.
Scratches are relatively more visible on a glossy-finished surface than a matt-finished one. This is true even for laminates.
3.2.1.3 Advantages of swing shutters
- Hinged shutters are inexpensive and low on maintenance. At the most, the hinges would need some minor adjustments, which you could do yourself without needing to call a carpenter.
- They are simple in design and last for years together.
- You get access to the entire wardrobe in one go as both shutters can be opened simultaneously.
- Swing shutters are light, making them very easy to operate (open/close), as opposed to sliding shutters where a lot more effort is needed. This is particularly relevant if you have aged people at home.
3.2.1.4 Disadvantages of swing shutters
- You need to leave enough space in front of the cupboard for the shutters to open. This could be an issue if your room is small.
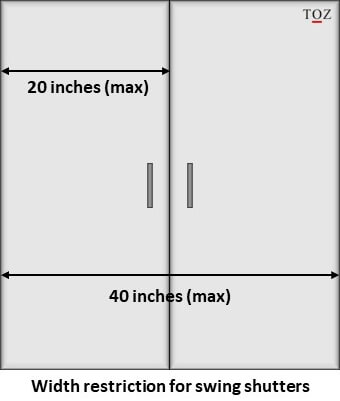
- Each shutter should not be more than 20 inches in width to avoid excess load on the hinges. The shutter also tends to get quite unwieldy beyond 20 inches. Hence most designers stick to a maximum shutter width of 20-21 inches. This means that you will mandatorily need to have a vertical partition in the carcass at or before 40 inches for fixing the shutter hinges. If this restriction of maximum width for every pair of shutters is an issue for you, then you will have to opt for sliding shutters.
- Swing shutters can have a maximum height of 7 feet as it gets unwieldy beyond that. Consequently, the loft needs to have a separate set of shutters. If you are keen to have a continuous seamless look from the floor to ceiling, then it would not be possible with swing shutters.
- Swing shutters have been around for centuries; some people find the look a bit boring. However, this need not be a con, as you can always spruce up the look with interesting colours and designs.
If your house is windy or you have kids at home, consider buying soft close hinges. They are marginally costlier, but protect the shutters from getting damaged by preventing the shutters from getting slammed shut.
3.2.2 Sliding shutters
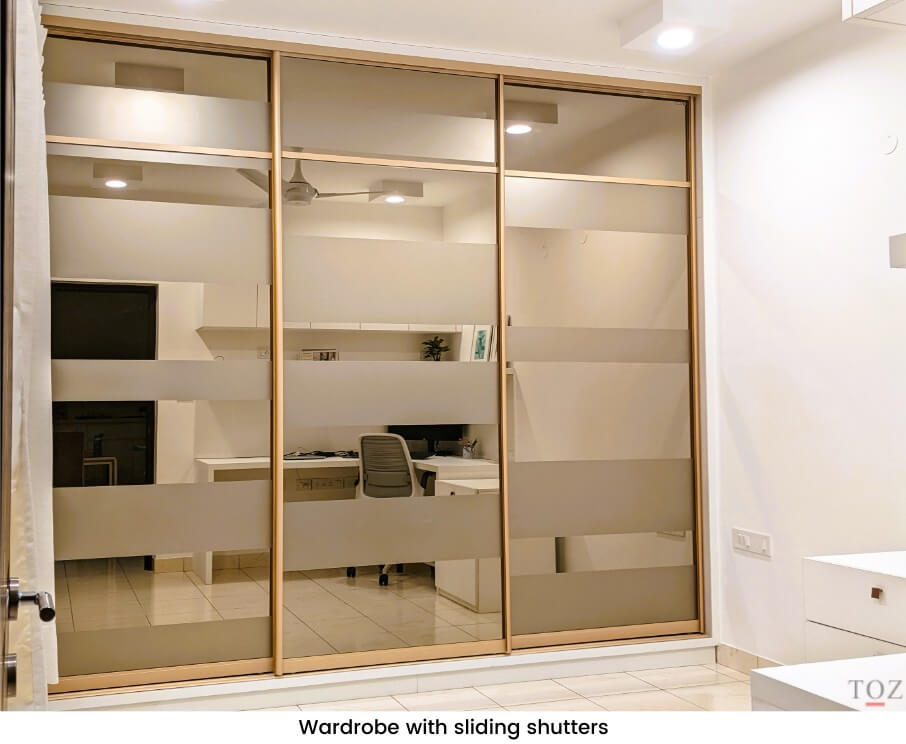
Sliding shutters have been gaining prominence in recent years primarily for their looks and improvement in the reliability of sliding mechanisms.
3.2.2.1 How does a sliding shutter work?
Sliding shutters have a rectangular metal frame into which the body of the shutter is fitted. The body of the shutter can be of a variety of materials right from plywood to HDF to glass. The shutter slides using a sliding mechanism, that most brands refer to as a ‘system’. The system is the most crucial (and most expensive) part of sliding shutters, that are often sold separately by companies. Design of the system varies by brand, with some even having their own patents.
3.2.2.2 Advantages of sliding shutters
- Sliding shutters excel when it comes to looks. Owing to the fact that sliding shutters can be heavier than swing shutters, a wide variety of materials can be used to arrive at any customised design. While lacquered glass is a common favourite due to its premium look, some people opt for sandwiching fabrics in between sheets of glass to create a unique look. The design possibilities are practically limitless. A search on the internet will have you doom-scrolling for months.
- Sliding shutters don’t swing open, so they are ideal when you don’t have enough space in front of the wardrobe.
- Unlike swing shutters that need to be attached to vertical partitions of the wardrobe carcass, sliding shutters are independent of them. There is no maximum width restriction, so you can have vertical partitions as per your need.
- Some sliding shutters can be as tall as 10 feet, which allows you to achieve a clean, seamless look right from the floor to the ceiling.
3.2.2.3 Disadvantages of sliding shutters
- Sliding shutters are far more expensive than swing shutters owing to the expensive sliding systems they use.
- Compared to swing shutters, sliding shutters are heavy and require much more effort to open/close. This may not be ideal for wardrobes that are going to be used by aged people.
- Unlike swing shutters, you cannot open both sliding shutters at the same time. So you don’t get access to the entire wardrobe in one go, as one part of the wardrobe is always blocked.
- Sliding systems are complex mechanisms that need to be maintained over time. The expensive ones need lesser maintenance, but it still is more than that of a hinged shutter.
3.2.2.4 Sliding shutter installation options
There are 3 ways you could buy / make sliding shutters and have them installed at home:
Option 1 – Buy the entire wardrobe (carcass, shutter and system) from the same company
This is the most convenient option but may turn out to be expensive as some companies charge a premium for the convenience. Also, depending on the company, you may or may not get the materials of your choice. For instance, a company may use only HDF for the carcass and may not be open to using plywood.
Option 2 – Ask your designer to build the carcass and buy the shutter and system from a company
In this option, you get the flexibility of selecting the carcass material. You may also save on some costs, but this option comes with its risks. Collaboration between the company and your designer must be seamless, with clear responsibilities of each party. Any disconnect/miscommunication between them could lead to a slip between the cup and the lip, with both parties pointing fingers at each other. Opt for this approach if your designer and the company have collaborated before.
Option 3 – Ask you designer to build the entire wardrobe
In this case, your designer will have to buy the carcass, system and shutter materials separately, customise the shutter as per your needs and install it. You can save a lot on costs. However, keep in mind that the building and installing sliding shutters is complex and needs a higher level of skill, so your designer should have prior experience in making these. If that’s not the case, I’d strongly urge you to avoid this option.
3.2.2.5 What to keep in mind when selecting a sliding system
Decide on the shutter body material before you select the system.
- Sliding systems have different grades based on weight of the shutter it can handle. For instance, a glass shutter is much heavier than an HDF shutter.
- The price of a sliding system goes up as the grade (load-carrying capacity) of the system increases. Don’t buy a grade that’s lower than what’s needed – it may work fine for the first few months, but thereafter, the shutter would gradually tilt and eventually fall off.
- For the sliding system, go for a reliable brand as the cheaper brands make the shutter quite wobbly, don’t slide easily, need frequent maintenance and don’t last beyond 3-4 years.
- Most systems are for wardrobes with a height of upto 7 feet. In case you want the shutter to extend right till the ceiling (upto 10 feet), you need to specifically ask for it.
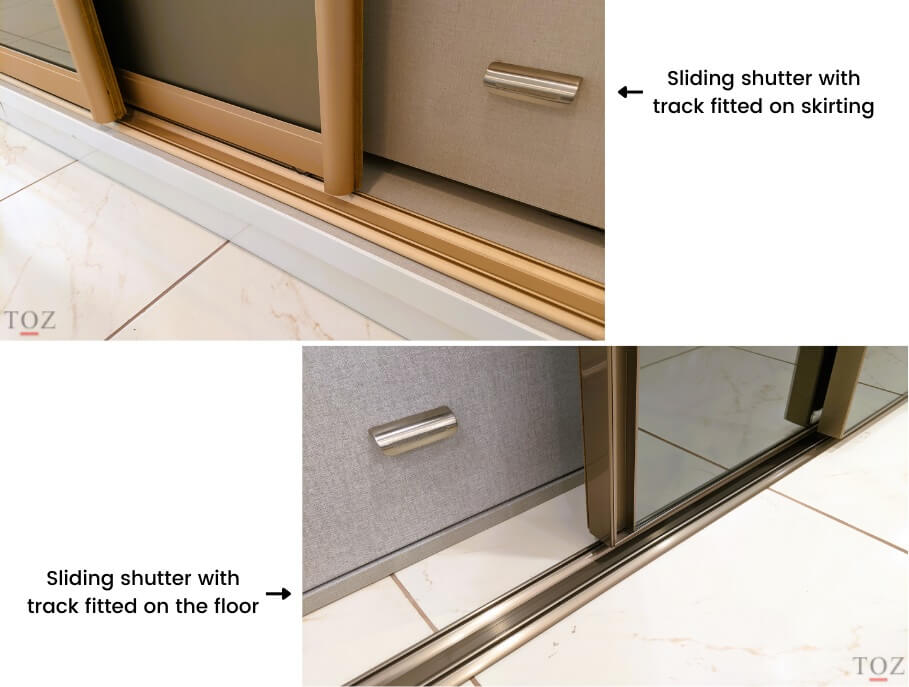
- Certain designs of systems tend to collect dust easily, so keep this in mind when choosing one.
Personal experience:
A sliding system that requires the track to be fitted on the floor will collect dust more easily than a track that’s fitted on a skirting. I bought both of these types for 2 different bedrooms. While it’s pretty quick and easy to get rid of the dust from the one with the track on the floor, I don’t like the compulsion of having to clean it every 10-12 days.
3.3 Designing the wardrobe’s internal layout
Designing wardrobe internals can be a bit dry and time-consuming, but it’s a one-time activity, and if done well, the benefits can be immense. Having your things well-organised is not only convenient, but also reduces the chances of things getting misplaced, and in some cases, may help you avoid buying additional unnecessary furniture.
Always do the first few drafts of the wardrobe internal layout yourself, before handing it over to a designer. Nobody understands your lifestyle, habits and preferences better than you.
Spend a good amount of time (preferably over a few days) designing your wardrobe layout in detail keeping your lifestyle, habits and preferences in mind. Clearly allocate space for every storage group that you had earlier identified for the wardrobe, accounting for growth of some of these groups over the years. As far as possible, avoid splitting groups across different storage locations, else you may be unable to find things when you need them. Allocate space for all groups even if you may have no items for some of them as of today – else you’ll inevitably find them lying around the house later and often getting misplaced.
Designing wardrobe internals is an iterative process – there will be a lot of back and forth and you will have to do this exercise in iterations, the layout getting clearer with each revision. You don’t need to make it very accurate; you could just draw it on a piece of paper. But going through the process is important – it will help you unearth a lot of your needs, get rid of things you may have been hoarding and make minor tweaks to some of your habits, that could eventually make your life easier.
The height of the section for hanging clothes, varies depending on the kind of clothes you want to hang. The standard height is 3 feet, but you may need a greater height for winterwear (like jackets, overcoats) and certain traditional Indian clothing.
3.3.1 What to keep in mind when designing a wardrobe internal layout
Here are some fundas (pointers) to keep in mind for wardrobe internals:
3.3.1.1 Shelves
- Always keep ergonomics in mind when designing your wardrobe. For instance, the deeper end of the lowest shelf is always difficult to access, so it’s better to have a drawer there instead.
- A shelf height of 12 inches is ideal for stacking clothes. Shorter shelves are difficult to access, especially on the deeper end. Taller shelves are generally not fully utilised as stacks of clothes generally tend to fall beyond 10 inches.
Avoid having short shelves on upper or lower extremes of the wardrobe as the deeper end becomes difficult to access. Have them in the middle instead, if at all.
- Decide on which shelves should have adjustable height. That way, you have the flexibility to adapt it to your changing needs over time.
- Consider keeping one tall shelf in one of your wardrobes. Over the years, there will always be a couple of odd-sized items that you will need to store (child’s project, toy or costume). If you don’t iron clothes everyday, you could consider keeping your ironing board in it, rather than letting it gather dust outside.
3.3.1.2 Drawers
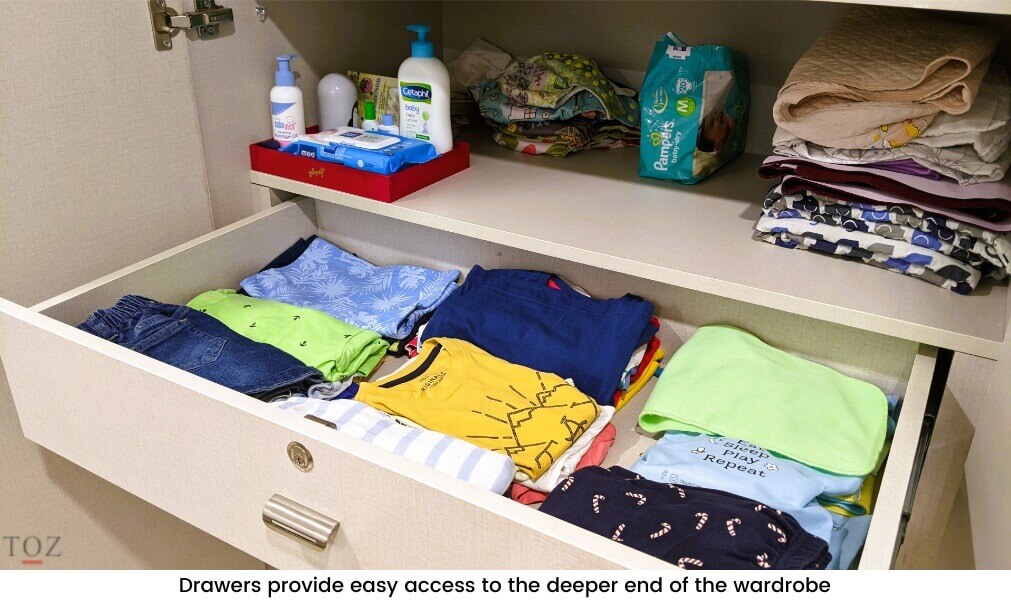
- Drawers are ideal for storing small items as they can be accessed easily even if they are at the deeper end of the wardrobe. This is particularly useful if you have a baby or toddler at home.
- Unfortunately, drawers are space inefficient compared to shelves, as a lot of space is lost in the structure and the sliding mechanism (channels). Depending on the kind of channel mechanism used in the drawer, the usable height of the drawer will be 1.5-2 inches lesser than its overall height.
Always consider the usable height of a drawer rather than its overall height when allocating space for storage.
- Keep narrow width drawers only if it’s absolutely necessary. 2 narrow drawers placed side by side waste more space than a single wide drawer.
- Drawers also cost additional money. Some designers may charge extra if you cross a certain number of drawers in a wardrobe.
3.3.1.3 Fittings
- There are several wardrobe fittings available in the market that can add a lot of convenience if it matches your preferences and habits. Some of them can be quite costly, so consider alternatives before buying. For instance, you could buy a separate trouser-hanger fitting in a separate section of the wardrobe, or hang your trousers along with your shirts, or even keep them folded in a shelf.
Keep a gap of atleast 2.5 inches above the hanging rods, so there is enough space to place/remove the hanger.
- If you have limited space in your wardrobe, you could use a pull-down wardrobe lift to utilise the loft space to hang clothes. It is a very useful fitting where you can pull the hanging rod down for hanging/removing clothes and then let the rod go back up once you are done. While this is a great convenience, keep in mind that the fitting itself takes up some space on the sides. So this fitting would make sense only if the space you have for hanging clothes is broad, say, 3.5 feet or more.
3.4 Make vs buy
As a thumb rule, for the exact same furniture, it is cheaper to buy a ready-made one from a store than to get it custom-made. That’s because manufacturers of store furniture have scale and are able to build it at a much lower cost. Custom-made wardrobes, on the other hand, utilise space more efficiently as they do not leave any gaps from the wall.
If you need a large wardrobe that will be carrying more load or will be used heavily, I’d suggest getting one that’s made of plywood. Given how the market is flooded with fibreboard (HDF/MDF/PB) wardrobes, you might it difficult to find stores selling plywood ones, but give it a shot nevertheless, you could get lucky.
Fibreboard wardrobes come in various attractive designs and cost relatively less. If you want a fibreboard wardrobe, first check for ready-made HDF wardrobes in stores, and if you find one that meets your needs and checks all the boxes, go for it. If you cannot find one that adequately serves your purpose, then you would have to get it custom-made. Avoid MDF and particle board wardrobes – they don’t last and you will end up spending again on a replacement.
4. Conclusion
Selecting the right design of your wardrobe is not easy. It takes patience and you need to take plenty of factors into consideration. But if you plan it well and go about it systematically, it can make a world of a difference to your daily life. And with the aspects we discussed today, you can be rest assured that you are better equipped to select a wardrobe that’s optimally suited for your needs.
Have questions or queries?
There are some pertinent queries that other readers have asked in the comments section at the end of this page; do go through them to see if any of them resonate with you. If you have a different question, feel free to mention it there; I will do my best to answer it. Please allow a few days for me to respond. If I (or any other reader) can answer it, then good. If not, atleast it will be something for the next reader to keep in mind. In case you have any learnings or experience to share, do mention it there for the benefit of other readers.
It is important to co-ordinate your wardrobe with the rest of the room furniture, not just in terms of looks but also in terms of storage and functionality. For instance, the size of your bed may influence the space available in front of the wardrobe, which in turn would affect whether you opt for swing or sliding shutters. So it’s important to consider all of them in tandem. To help you with that, you could check out my other posts on:
- How to select the right bed design – this is a deep-dive into factors like build material, storage options, headboard options, height, make vs buy and their respective pros and cons.
- A practical guide on choosing the right mattress – after all, a bed is only as comfy as the mattress on top of it. There’s nothing like feeling fresh after a good night’s sleep.
- How to select the right ceiling fan for every room – this would be particularly useful in case you need a quiet fan (say, if you work from home and attend meetings) that also consumes less power.
It’s common for people to design their wardrobes and kitchen designed and executed together. If that’s the case with you, you can refer to my other post:
- A practical guide to planning your kitchen design – This explores design and material considerations for cabinets, drawers, shutters, countertop, splashback, fittings, sink and lighting. It also details out a structured approach to designing your kitchen.
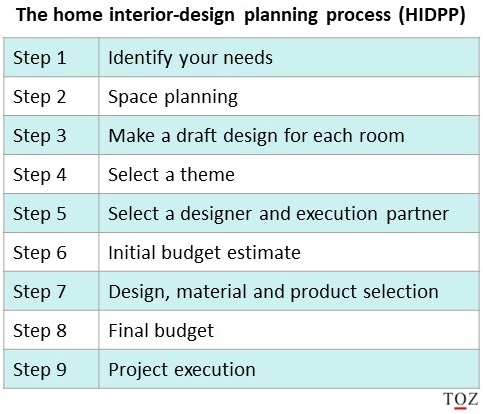
If you are planning to get your home interiors done, I’d suggested going through the home interior design planning process, where I delve into how to go about systematically planning the interior design of your house from a layman/customer perspective. It’s a structured approach that ensures you’ve asked the right questions, assessed your needs, understood the pros and cons of different options, budgeted prudently and designed your house in a way that’s optimally suited for your needs.
Here are the links to the respective posts:
Share this post:

During the monsoon we sometimes see leakages in the walls which could affect the wood in the cupboards. What kind of considerations should we have while selecting wood and design to ensure the cupboard wood doesn’t get damaged by potential invisible wall leaks?
I see 2 issues that you need to address here.
WATER SEEPAGE:
Water seepage issues tend to become worse overtime with the wall getting weaker, fungus developing on it and furniture getting spoilt. So it’s best to nip it in the bud. I’d suggest you hire a contractor and identify the path through which the water is reaching the wall. Couple of common reasons for the seepage:
1) If you have sliding windows, get the channels cleaned so that water doesn’t collect there. An old toothbrush is enough to clean it and clear the water exit path. Generally there are a couple of holes in the channel to allow the water to flow out. Water tends to seep into the wall since it cannot find a way out. This is a very common reason for water seepage with a surprisingly easy solution.
2) Water seepage is common near window sills, so consider putting a waterproof coating there. I got it done 7 years back in one of the windows of my parent’s house and it’s been very effective.
I would strongly urge you to identify the root cause and get it rectified. Check with you neighbours if they too are facing a similar issue. It is a bit of civil work, with cementing and plastering, but its the best cost-effective and long-term solution.
CUPBOARD MATERIAL
I normally don’t suggest using water-resistant or waterproof ply for wardrobes as it’s expensive and bedrooms are not exposed to water much. If you can get the water seepage issue fixed, then you should be fine. However, if you have important documents in the wardrobe that you cannot keep elsewhere at home, then I’d suggest using BWP plywood for your cupboard carcass. Laminate gives an additional layer of water protection. If you are keen on MDF shutters, consider applying a transparent protective coating of PU (polyurethane) on top.
Very well articulated article and so extremely useful.
Thanks Saurabh 🙂