
1. Introduction
Light influences our body clock, moods and emotions. The right lighting can create the right ambience, and better equip a room to serve its purpose; all without skyrocketing electricity bills. It is therefore essential to get lighting right. This post focuses on the following 7 aspects of home lighting design:
- Lighting layers and their purpose
- Wall lights vs ceiling lights
- False ceiling lighting options
- Colour of lights (colour temperature)
- Calculating wattage and number of lights for a room
- Smart lighting options and how they work
- Some fundas (pointers) to keep in mind for home lighting
I’m sure you would have come across this…
You walk into a friend’s house, it’s beautifully designed – exquisite furniture, choicest décor and beautiful lighting. And suddenly, in the middle of all this, there is an ugly tubelight or a naked bulb on the wall. This is a very common phenomenon.
With the number of lighting options available out there, we are literally spoilt for choice. Not surprisingly, lighting is one area on which most people overspend by a mile. And even after spending so much, we often come across homes that have beautiful lighting, but it is difficult to get some basics tasks done, like reading a book. And that explains the tubelight.
Objective planning can avoid this.
Lighting must be functional first; aesthetics come in only after that.
2. Lighting layers and their purpose
There are many ways lighting layers are defined, but I am going to stick to the 4 basic layers. It isn’t mandatory for you to have all of them for every room, but keeping these categories in mind will help you structure your thinking around how to setup the lights for your house.
- Ambient lighting – This is what provides the general level of lighting of the room along with natural light.
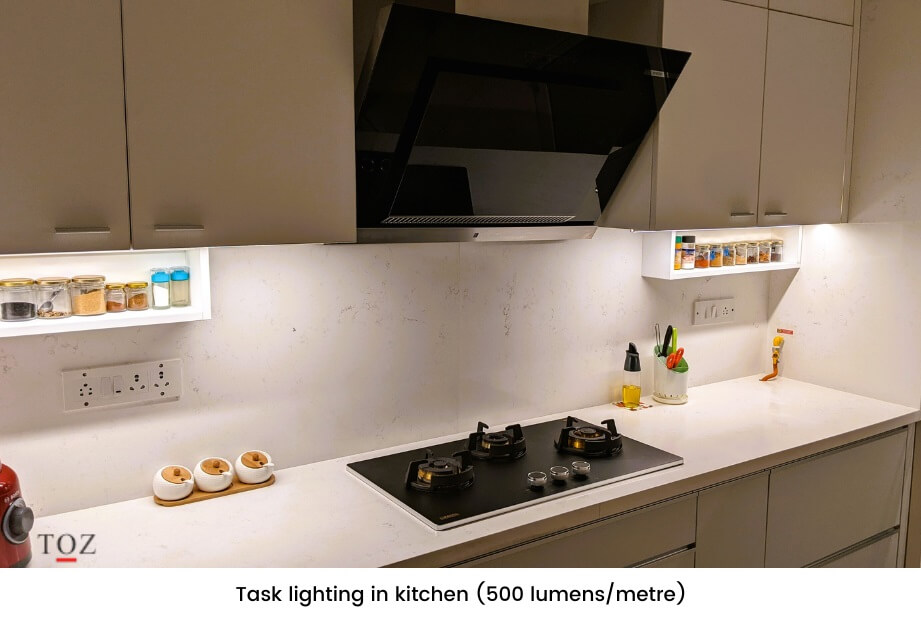
- Task lighting – As the name suggest, this focuses on a particular area for a specific task. Examples of these include study-table lights, kitchen countertop lights, reading lights and vanity lights in the bathroom.
- Accent lighting – This lighting is meant to draw attention towards specific items like art pieces, shelves or certain decor items.
- Mood lighting – This is essentially an indirect form of accent lighting. It is generally dim, diffused and sets the atmosphere of a room. Examples would include ceiling cove lights, floor lamps, table lamps or lights placed behind a couch or furniture.
You don’t necessarily need separate light fixtures for each layer. Sometimes the same light can serve the purpose of more than one layer.
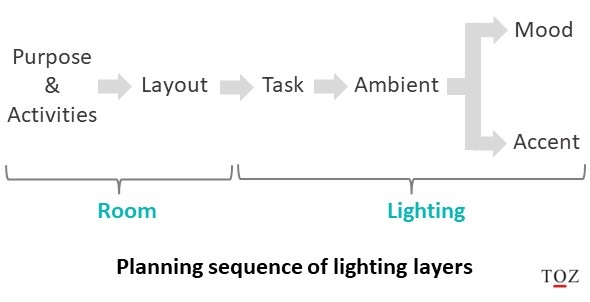
Planning sequence:
- The first step is to identify the purpose of a room followed by the activities it will cater to. Once you are clear on how you intend to use the space, you would get a sense of its lighting needs.
- Draw a layout of the room marking immovable objects, furniture, switches and sockets.
- Start with task lighting, as this is a functional need that you cannot compromise on. You can mark the points on your room layout diagrams.
- Ambient lighting is also functional and should be addressed next.
- Once you are done with task and ambient, you can focus on mood lighting and accent lighting in tandem.
The objective is to combine different layers to achieve an appealing, yet functional lighting design.
3. Ambient lighting
3.1 Wall lights vs ceiling lights
Over the years, wall lights have been predominantly used for ambient lighting. However, there has been a gradual shift into ceiling lights in recent times. As it turns out, ceiling lights are better suited for bright ambient lighting than wall lights. Here’s why:
- Glare – With ceiling lights, you don’t feel the glare of the lights in your eyes as you rarely look up at them directly. This in contrast to wall lights, where the chances of looking at the light directly are much higher. You could put a shade/diffuser on a wall-light, but it’s an additional cost, and it also reduces the light reaching the centre of the room.
- Distribution – Ceiling lights provide better distribution of light as you are not restricted to the edges of the room. You can fix them away from the walls as per your needs.
- Ceiling lighting frees up wall-space for you to hang decorative items.
Personal experience:
We’ve always had wall lights in all of the houses we’ve lived in and have found it comfortable. Though I knew about the benefits of ceiling lighting (theoretically), I hadn’t really experienced it in real life. It was only in our current home that we explored ceiling lighting, as the builder had provisioned electrical points in the ceiling. Today, I can definitely vouch for ceiling lights. The light distribution is better, I don’t need excessively bright lights and the ambience of the rooms is much more soothing.
3.2 Ceiling lights
For ambient lighting, ceiling lights can be of 2 types:
1) Surface lights that are fixed to the surface of the ceiling.
2) Recessed lights that are fixed into the false ceiling (or occasionally into a hole in the ceiling).
3.2.1 Things to keep in mind when fixing ceiling lights
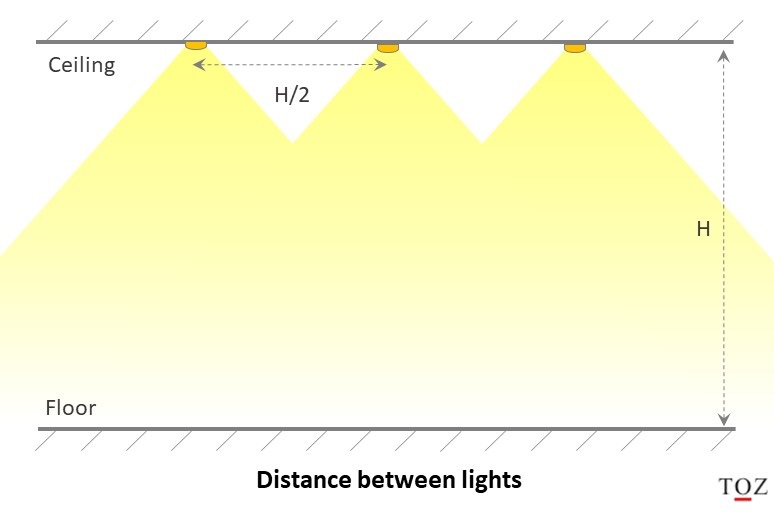
a) Distance between lights
It is important for the beams from different ceiling lights to overlap, else you will end up with dark patches. Hence consecutive ceiling lights should not be too far apart.
A thumb rule for the distance between 2 ceiling lights is to not exceed half the height of the room. So if your room height is 9 feet, you should have a ceiling light every 4.5 feet or less.
b) Distance from wall
If the lights are too close to the wall, you will notice that the light falls on the wall in the shape of a cone. Some like this look, some don’t, it’s a personal choice. If you want to avoid these cones, fix the ceiling lights atleast 2 feet away from the wall.
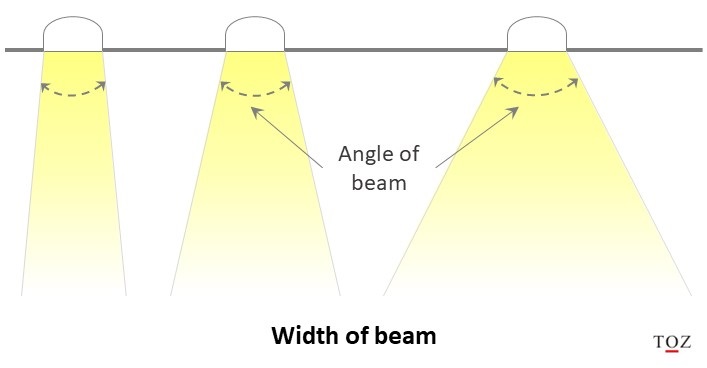
c) Width of beam
The beam of a ceiling light varies from narrow to wide based on the model you select. The angle of beam varies between 25 and 120 degrees. For most ceiling lights meant for ambient lighting, it varies between 100 and 120 degrees. Lights with narrower beams are used for accent lighting. So make sure you check the angle of beam mentioned on the box before buying.
4. Mood lighting
4.1 False ceiling and its lighting options
False ceilings are fairly common and for some reason many believe that it is one of the pillars of a modern look. Some opt for a false ceiling since they mistakenly believe that cove lighting is the only form of mood lighting. Before opting for a false ceiling, it’s important to understand what it means to have one.
Here are some things in mind when considering false ceilings:
- Room can feel small – A false ceiling is usually only 5-8 inches thick. But if it spreads over a large area, it can make the room feel quite small.
- Wiring changes can be messy – Since all the wiring is concealed in the false ceiling and access is restricted, repercussions of a shabby wiring job show up only a few years later when fixing issues or making modifications. It is imperative that wiring is done systematically, ensuring that wires for individual lights can be identified easily in future.
- Maintenance – Some false ceiling lighting designs (e.g. inner cove) are prone dust collection which can make the lights dim. Regularly cleaning becomes necessary, and that can be a pain in the long run.
- A false ceiling need not cover the entire ceiling, you could have it only for a section of the ceiling.
- It’s not necessary to have a false ceiling in each and every room of your house.
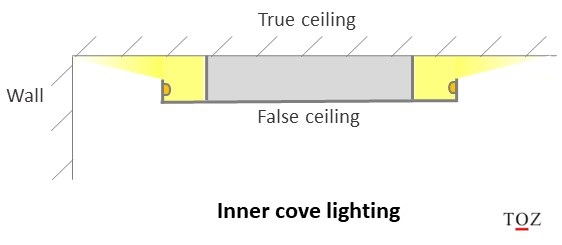
4.1.1 Inner cove lighting
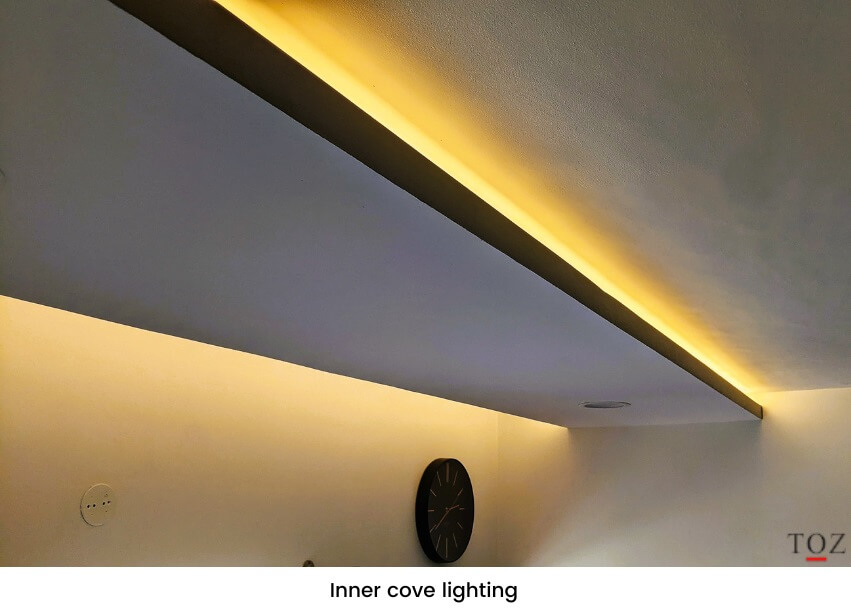
Inner cove lights are very popular in the residential space as they distribute light very well. Light directed towards the ceiling gets diffused evenly across the room giving it a soothing feel. However, the cove needs to be cleaned regularly as dust tends to get collect in it, making the lights dim. Accessing the cove isn’t easy, so keeping it clean can be a pain, especially if you live in an area with high dust levels.
4.1.2 Outer cove lighting
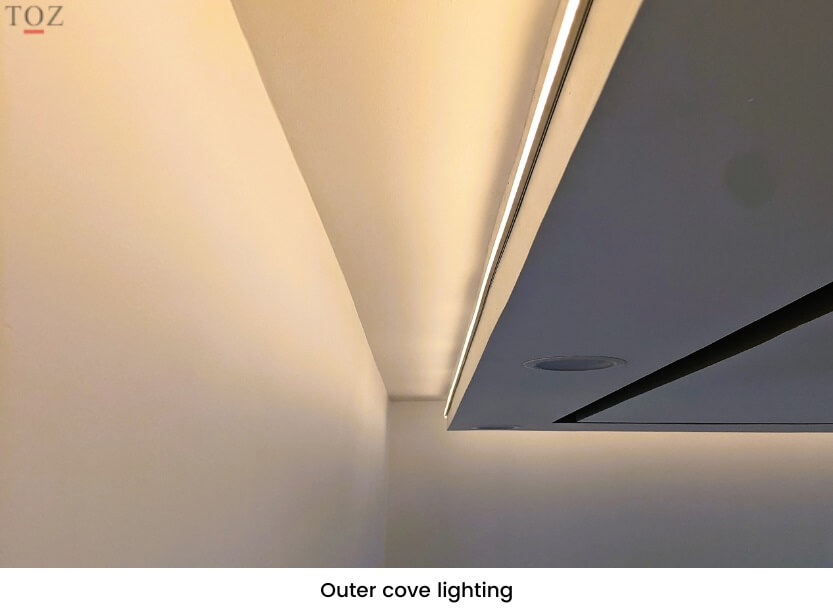
Outer cove lighting is a type of peripheral lighting where light is directed towards the walls instead of the ceiling. The light falls with a vertical gradient on the wall, rendering a unique look. Peripheral lighting accentuates the edges of the room making the room appear spacious. The best part about outer cove lighting is that it needs no maintenance – as the light is fixed on the vertical part on the side of the false ceiling, there’s no scope for dust collection.
5. Colour of lights
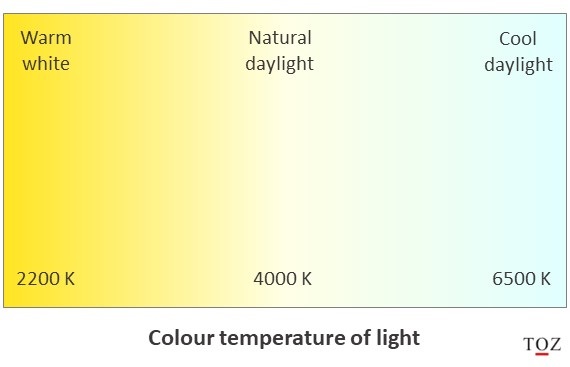
Colour (or colour temperature) of light is expressed in Kelvin (K). On one end there is cool daylight at 6500K and on the other end there is warm white at 2200K. Natural daylight (or neutral white) is in between at about 4000K.
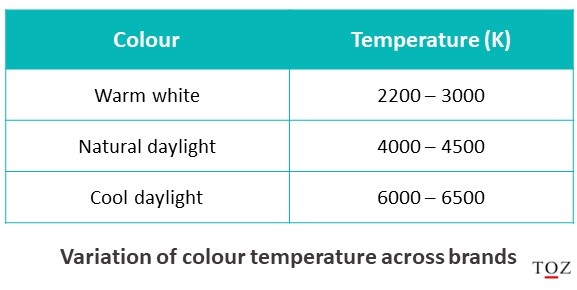
Manufacturers group their lights into 3 main colours – warm white, natural daylight and cool daylight. However, there is a variation of colour temperature across manufacturers for the same colour. For instance, the colour of warm white light varies from 2200-3000K depending on which brand you buy from.
Even though 2 brands may refer to the same colour, there may be a difference in the actual colour of light emitted by them. So for a given colour of light, stick to the same brand for your entire house (or atleast for the same room). In fact, I have seen differences between two product segments of the same brand as well. So make sure to check the colour temperature numbers before buying.
Warm white is best suited for ambient lighting and can also be used in cove lighting. Cool daylight is best suited for reading, so study and reading lights are mostly fitted with lights that emit this colour.
Most light fixtures and bulbs emit any one of the above 3 colour of lights. However, there are some models where you can switch between these colours by switching the light switch on/off in succession.
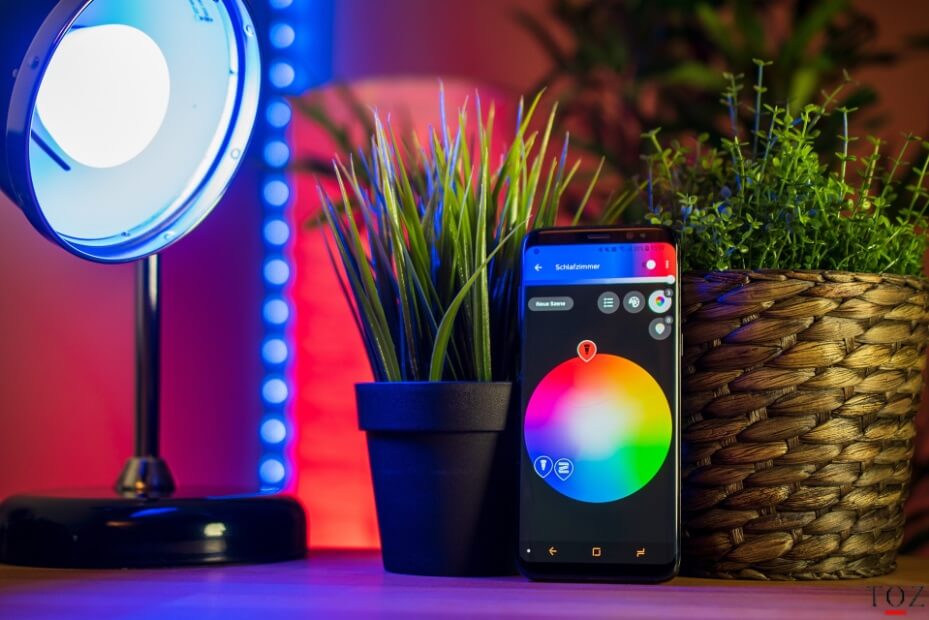
Apart from these 3 colours, you get lights that can emit other colours as well (red, blue, green, purple etc.). In fact, with smart lights, you can get upto 16 million colours. Such lights are better suited for parties and mood lighting. They aren’t practical for everyday ambient lighting though.
6. Calculating wattage and number of lights for a room
This is a tough one. Most people struggle with this and often end up over or under illuminating their rooms. There are several challenges with figuring out the right wattage of lights. So let’s look at this topic systematically in 3 steps:
- The mathematical approach
- Practical challenges faced in real life
- Potential solutions to address the above challenges
6.1 The mathematical approach to calculating wattage and number of lights
Some basics first:
- Lumens – Light is measured in lumens. Lumens is the total amount of light emitted by a source. More the light, more the lumens.
- Lux – Lux is a measure of illuminance. It is the amount of light that is spread over a given surface area. So if the same amount of light is spread over a large area, then the illuminance levels are lower. Lux is measured in lumens per square metres.
- Every light in the market will have the wattage, colour temperature and lumens level mentioned in its packaging.
Let’s calculate the lighting needs of a rectangular room that’s 5 metres x 4 metres.
Step 1 – Calculate lumens needed
- Area of the room = 5 x 4 = 20 square metres.
- Let’s assume the right Lux level of a drawing room is 200 lumens per square metres.
- Total light needed = 20 x 200 = 4000 lumens.
Step 2 – Calculate number of lights needed
- Suppose the light we have selected is rated 7W, 700 lumens.
- Number of lights = 4000/700 = 5.7
So we need to evenly distribute atleast 6 lights in the room.
If you are using a mix of different kinds of lights, you need to make sure the total is atleast 4000 lumens.
It’s that simple……on paper 😊. Reality is a lot more complicated owing to several practical challenges.
6.2 Practical challenges faced in real life
- Finding the right Lux level – If you notice, the entire calculation above hinges on the Lux level we assumed in step 1. Get that wrong and the entire calculation goes awry. Unfortunately, the right illuminance (or lux level) of a room is a personal preference and varies from person to person. Most people don’t know their preference of room brightness in terms of the lux level.
- Position of lights – The position of light influences the wattage needed. For instance, you cannot have bright lights when the lights are closer to the eyes (table lamps or wall lights that are at a lower height), as you would face a lot of glare.
- 2 lights with the same wattage from different brands may not have the same brightness.
- To reduce glare, you may put a diffuser or a smoked glass cover. But that would reduce the brightness of light.
- A room with darker furniture will need brighter lights as lesser light is reflected off the surfaces.
- Lights tend to lose brightness levels over the years (lumen depreciation), so what’s perfect today may be insufficient a few years later. The rate at which lights lose their intensity also varies by brand. What some brands will lose in 5 years, others will lose in 3.
Personal experience:
Never judge the brightness of a light in a store displaying lights. Your eyes adjust to the higher brightness levels of the store and you always end up buying a light that’s brighter than what you need. I say this from personal experience of a fairly expensive chandelier we bought. It hung in our drawing room for 4 years, but we could never use it as it was too bright.
6.3 Potential solutions to address the above challenges
There are 2 ways you can address the above challenges:
- Invest in dimmable lights – Dimmable lights have their advantages. You need not be very accurate in terms of the wattage. You buy slightly higher wattage lights and dim them as needed. Also, as the lights age over the years and lose their intensity, you can dim them to a lesser extent. Dimming is a standard function in all smart lights. But if you are buying normal lights, you need to buy dimmers separately.
- Use a Lux meter – A lux meter can help you arrive at the right lux level for each area of your house. Unfortunately, this is a one-time activity, so the lux-meter becomes practically useless after you use it. I have not tried this approach.
Personal experience:
For my current home, I was keen on arriving at the right lighting mathematically, but soon realised the challenge with finding the right lux level. The idea of using a lux meter hadn’t occurred to me back then. Internet sites that recommended lux numbers were aligned to homes and lifestyles of other countries. I visited several stores, spoke to their salespersons and some connected me to their illumination consultants. Some even gave me their sample pieces to try, but none of it was convincing. I concluded that dimmable lights were the way to go. For my setup, smart lights turned out to be a more cost-effective than using traditional wired dimmers. If I back-calculate the lux level with my current setup, I see that I prefer a minimum lux level of 200 (as opposed to much lower numbers that some internet sites had suggested). But that’s just my preference.
7. Smart lighting
While there’s a lot of excitement around smart home products and the possibilities they open up, I have found little value in most of them in my current lifestyle. However, I find smart lighting to be an exception. After some analysis, I decided to opt for smart lights, and looking back, I can say it was a good decision.
7.1 What are smart lights?
Smart lights are basically normal LED lights; just that they have an additional chip in them via which they can be controlled wirelessly using a remote or a smartphone app. This opens up a host of possibilities – you can dim them, change their colour, follow schedules, integrate it other products (like motion sensors, light sensors, TV, music system) and even operate them with voice assistants like Alexa, Siri or Google home. You can do a lot, but you don’t necessarily have to.
7.2 Myths about smart lighting
a) Smart lights are expensive
This is a blanket statement that you should always take with a pinch of salt. Yes, on the face of it, a smart bulb is more expensive than a normal bulb, but a smart lighting setup can help you save more in terms of needing to buy fewer lights as well as lower electricity consumption. I’ll explain this subsequently in this post.
b) Smart lighting is complex
There is a popular perception that setting up smart lights is so complex that only a specialist can implement it. And this gets further accentuated by enthusiasts online who come up with some brilliant, but complex setups. Not surprisingly, we have illumination consulting firms budding all around trying to capitalise on this perception.
Smart lighting is complex, only if you want it to be.
There are simple setups that would suffice for most people, and then there are the more complex setups. What I found is, while a lot of these complex setups are fascinating in terms of what technology can do, they aren’t practical from a daily life perspective.
Personal experience:
I opted for a smart lighting setup for my house. I was looking only for basic functions like dimming and changing colours between white and yellow. It took me a few weeks to understand the options, but I soon realised it wasn’t complex at all and was able to set it up on my own.
7.3 What can a smart light do?
While smart lighting systems are capable of a lot, here are the features/benefits that I find most relevant:
1) Dimming
Dimming in smart lights is much smoother than traditional wall dimmers. It also helps in lowering electricity consumption. Though the savings may seem minor, it can add up to a significant amount over time.
2) Change colours
You can change the colour of a smart light using its app or remote. Most models allow a smooth variation between yellow and cool daylight; this should suffice for most people. There are advanced models as well where you can choose from upto 16 million colours.
3) Scheduling
You can schedule smart lights to switch on/off, change brightness or colour at a pre-determined time. You can also synchronise them with a weather app or integrate them with light sensors wirelessly. This can ensure that electricity is optimally utilised.
4) Multi-purpose usage
The same smart light can serve the function of more than one layer of lighting. By simply varying the colour and brightness of different smart bulbs, you can use same set of lights for mood lighting, ambient lighting as well as task lighting. This can help you reduce your upfront purchase costs as you need to buy fewer lights.
5) Motion/light detection in a cost-effective manner
Motion detectors are helpful when you have your hands full or need light for a short while. This could be when dropping something into your store room, passing through a corridor or entering home after shopping.
Rather than keeping the corridor lights on all through the evening, you could reduce your electricity usage by setting them up to stay dim or switch off completely when the corridor is not in use. Smart lights are useful if you need to visit the washroom in the middle of the night – they can detect your presence, automatically switch on, stay dim and switch off subsequently, thereby causing minimal disturbance to your sleep.
Similarly, light sensors optimise electricity consumption by adjusting the brightness of light based on the natural light available.
The traditional approach to setup motion/light sensing lights is quite expensive given the wiring needs between the sensor and the lights. Smart lights have no such wiring needs, making motion-based light control possible at a fraction of the cost.
6) Smart plug
A smart plug can be controlled remotely, making it quite useful in some cases. For instance, you can schedule to switch on your geyser in advance, so that hot water is ready by the time you wake up in the morning or reach home after work.
Smart lights have other advanced features as well, but may not be suited for most people. For instance, all lights shutting on/off when you arrive/leave home (using your GPS location), synchronising the colour of smart lights behind your TV/computer monitor to the colours on the screen, synchronising the lights with music or integrating the lights with other smart products.
Personal experience:
I had to weigh my options before opting for a smart lighting setup at home.
Going with normal LED lights meant buying separate lights for mood, ambient and task lighting. With smart lights, a little tweak in the brightness and colour of a few lights could totally change the look of the room; I didn’t need to depend on additional wall-lights. We also realised that even minimalistic central chandeliers and wall lights were quite expensive, so we decided to drop them completely. We also decided not buy motion or light sensors right away, and take a call a few months later. Our smart lighting setup turned out marginally cheaper (3%) than the normal lighting setup.
7.4 How does a smart light work
There are 3 types of smart lights based on the technologies they employ for connectivity, each with its own pros and cons. It’s important to get a basic idea of how these work, so you can decide which one is optimal for your needs.
7.4.1 Bluetooth smart lights
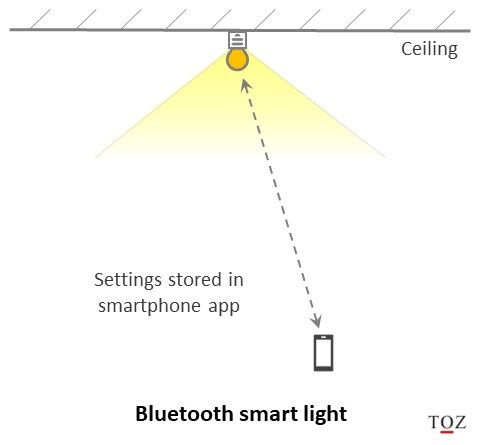
This is the most basic type of smart light. You can control them with your smartphone using Bluetooth. They are ideally suited for those who want to start experimenting with smart lights. You just fit the bulb in the holder, download the app on your phone and control the light via Bluetooth. As the Bluetooth connection is direct between the phone and the light, the light’s response is almost instantaneous. Unfortunately, the light can be controlled by only one smartphone at a time. This can be a problem if multiple people at home want to control the lights, as each of them would have to individually connect their smartphone to the bulb each time.
Bluetooth smart lights are great if you want to have a few in a room or two, but not recommended if you want to use smart lights across all rooms of your house.
Pros
- Low investment, no need to buy any additional products such as a hub/bridge.
- No dependency on Wi-Fi or an internet connection.
- Quick and easy setup.
- There is no lag, the light’s response is almost instantaneous.
Cons
- Bluetooth range is limited, so you need to be in the vicinity of the light.
- You cannot control the light when you are outside your home.
- 1-1 connectivity – The light can be controlled by only one smartphone at a time.
- Limited features – mostly limited to dimming and changing colour.
- Occasional issues in Bluetooth connectivity.
- A prolonged Bluetooth connection drains your smartphone battery.
7.4.2 Wi-Fi smart lights
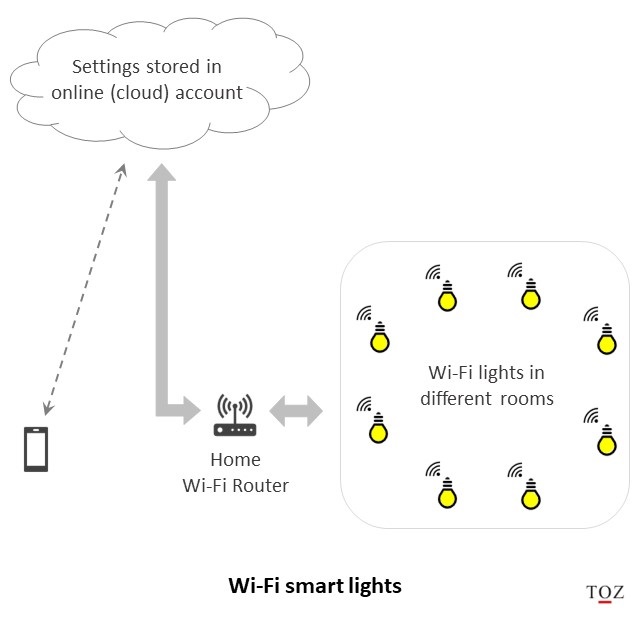
These are also a good buy for those starting to experiment with smart lighting. These lights connect to the internet via your home Wi-Fi network and you can control them from an app on your phone from anywhere as long as it is connected to the internet. Unlike the Bluetooth models, there is no 1-1 connectivity here, so multiple people can control the lights via their respective smartphones without needing to connect to each bulb every time. But keep in mind your home Wi-Fi needs to have good coverage to ensure that all the smart lights are able to connect to it. Another disadvantage is that these lights are dependent on an internet connection as all settings are stored in your online (cloud) account. So if your internet connection is down, you need to connect the lights to the internet via a hotspot to control it, which can be quite a hassle.
Since any changes you make on the app, reaches the light via the internet, there is a small lag in the light’s response.
Response time of Wi-Fi smart lights go up as you connect more smart lights to your router. Therefore, they aren’t recommended if you want to want to use smart lights across all rooms of your house.
Pros
- Low investment, no need to buy any additional products such as a hub/bridge.
- No range issue, lights can be controlled even when you are out of your home. This is particularly helpful if you missed switching off some lights when leaving home.
- No 1-1 connectivity – different people can control the lights using their smartphones.
- A few additional features than the Bluetooth models (e.g. setting light schedules)
Cons
- Dependency on a stable internet connection.
- Dependency on good Wi-Fi coverage throughout your house.
- Slower response.
7.4.3 Hub smart lights
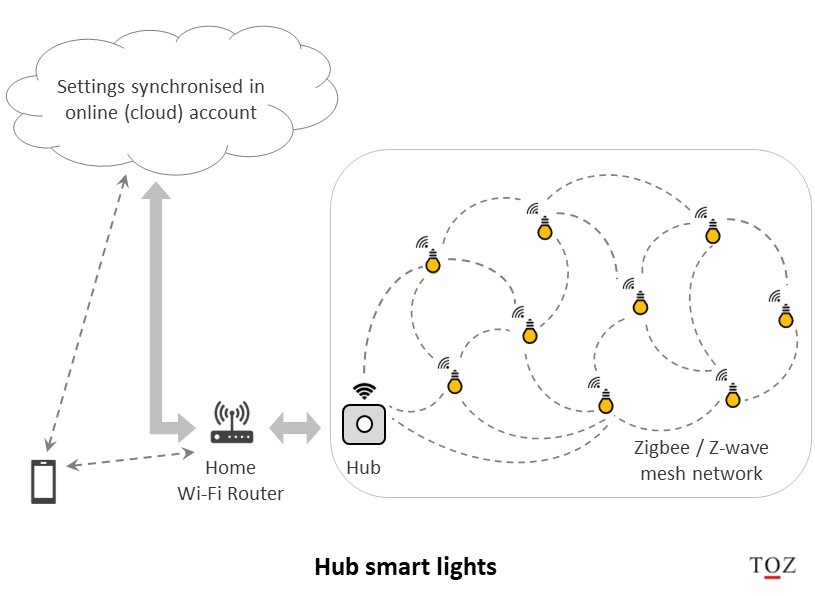
This is an advanced setup of smart lighting where you need to invest in a hub/bridge. All devices (lights, motion sensors, light sensors etc.) connect to the hub via a low-power, high-speed wireless network called zigbee or z-wave, that is independent of, and far more reliable than Wi-Fi.
The unique benefit of this network is that it is a mesh network, where the lights not only connect to the bridge, but also with each other. This way, each light doubles up as a ‘booster’ as signals travel to/from the bridge by bouncing off other lights. This extends the range considerably and your home Wi-Fi coverage doesn’t really matter. Response time of lights is low and unaffected even if you add several lights.
A hub-based smart lighting system makes more sense if you want to put smart lights across your home.
You also have little dependence on continuous internet connectivity because all your settings are stored locally in the hub in your house. So even if your internet is down, all your light functions work fine barring a select few advanced features. The hub regularly synchronises with your online (cloud) account in the background.
These systems have the widest range of features and are able to integrate with several other smart devices and platforms like HomeKit and IFTTT. They also come with optional remote controls that you can choose to buy if you prefer a physical switch.
Implementation of motion/light sensors with hub-based smart lighting systems is easy, reliable and cost-effective.
What I particularly like is the implementation of motion/light sensors for foyers, corridors and bathrooms. The sensors are tiny battery-operated boxes that are so light, that you can stick them to a surface using double-sided tape. You then configure the app so where you can choose which light switches on (to a brightness level of your choice) when motion is detected. The sensor communicates to the light via the hub/bridge using the zigbee network. This is far better and cost-effective than the traditional method that requires a lot of electrical wiring work, especially if the sensor is far from the light. Also, since zigbee/z-wave are low powered networks, the batteries have a long life of atleast a year or two.
The biggest disadvantage of hub/bridge systems is that they are expensive.
Buying a hub-based smart lighting system is somewhat similar to buying an iPhone – you are basically buying into an ecosystem, rather than a product alone, and you can subsequently buy other components of the ecosystem based on your need.
Pros
- No dependency on the internet (except for a few advanced features).
- No dependency on home Wi-Fi network coverage.
- Can integrate with a wide variety of smart products and services.
- No range issue, can be controlled even when you are out of your home.
- No 1-1 connectivity – different people can control the lights using their own smartphones.
- Response time is low and unaffected by number of smart lights in the house.
- Simpler implementation of sensors than traditional methods.
Cons
- Expensive, as you need to invest in a hub/bridge.
Personal experience:
I opted for a hub-based smart lighting system in my house as I wanted smart lights in all rooms and no dependency on internet connectivity. It’s a basic setup with no motion/light sensors or integration with any of the other smart-home products at home. A couple of months after implementing it, we opted for physical battery-operated dimmer switches as we didn’t want another reason to look at a smartphone screen. We barely need to use them though, as scheduling works like a charm. We’ve been very happy with the lighting setup.
Since I enjoy tweaking with things, I’ve scheduled the lights to gradually brighten with sunset, change colour from white to yellow through the evening and dim down as we approach bed-time. What I find interesting is, my toddler is influenced by this light schedule and starts preparing for dinner/bed on his own 😊.
8. Lighting effects
The right lighting effect can make a big difference in the look of a room. Since aesthetics is not the main focus of this post, I will not delve deep into lighting effects. I’ll just mention the main ones to help you think through the lighting scheme for your house.
- Perimeter lighting – This is typically used to make a room look bigger by accentuating its periphery by placing lights along the perimeter of the room. You will commonly see this effect in ceiling cove lights.
- Wall-washing – The wall is evenly illuminated by placing a one or more light sources at a short distance from it. Keep in mind this is different from placing strip lights in an outer cove, where the lighting effect is more of a gradient than an even distribution.
- Wall grazing – The light is intentionally placed very close to a wall so that its texture is highlighted.
- Downlighting – Light is directed downwards from the ceiling of a room, shelf or cabinet. It causes shadows for things/people right below it, so you need to balance it with adequate lighting from the sides via ambient lighting or placing the next downlight relatively close. There is no scope for dust-collection and the light barely loses any brightness.
- Uplighting – The light here is softer as it bounces off the ceiling or inside a shelf or cabinet. Avoid fixing these at lower levels as the glare will hurt your eyes. These lights also need to be cleaned regularly as dust easily settles on them.
- Spotlighting – Spot lights are commonly used in task or accent lighting to highlight a space or feature like a painting or a sculpture.
9. Some fundas (pointers) to keep in mind for home lighting
Well-illuminated walls make a room look lively. The centre of the room doesn’t necessarily need very bright light.
- When placing lights, start with illuminating the corners first followed by the walls and then the central part of the room (if at all needed).
- Bathrooms should be well-lit. To avoid glare, you could have 2 lights of medium brightness instead of a single bright one. Fixing the light on the ceiling instead of the wall may help avoid glare. If the glare persists, you could use a frosted glass shade over the light bulb or buy a bathroom lamp that comes prebuilt with a diffuser or a frosted glass cover.
- For kitchen lighting, you can refer to my post on kitchen design.
- For home office lighting, you can refer to my post on home office design and setup.
- In case you are getting your interiors done from scratch, plan your lighting right in the beginning along with civil work. This way you can ensure you have the right number of switches and plug points available at the right places; be it for table lamps, floor lamps or any other lights. Multi-plugs and extension boards can be difficult to manage and quite ugly if visible.
10. Summary
- Plan your lighting layers in the sequence: Task, ambient, mood, accent.
- Ambient lighting
- Ceiling lights have lesser glare and better distribution than wall lights.
- When placing ceiling lights, space them out such that there is sufficient overlap between the beams of consecutive lights. This ensures adequate illumination. Use half the ceiling height as a thumb rule.
- When buying lights always check for the width of beam as it varies across models.
- Mood lighting
- Mood lighting can be achieved in many ways; false ceiling lights is only one of them.
- If opting for false ceiling lights, weigh out the pros and cons of inner and outer cove lighting before selecting one.
- Colour temperature of light varies from 2200K to 6500K. It even varies across brands, so stick to one brand for each room.
- When deciding on wattage and number of lights, consider practical aspects such as position of lights, losses due to diffusers as well as the colour of walls, furniture and décor. You could use a lux meter or opt for brighter lights along with dimmers.
- Smart lighting
- Smart lights provide flexibility in lights in terms of dimmability, change of colour, scheduling, motion detection and various other features.
- Bluetooth smart lights are quick and easy to install, but have limited features and 1-1 connectivity.
- Wi-Fi based smart lights have more features (scheduling, out-of-home control) than Bluetooth models and can be controlled by multiple people, but are dependent on internet connectivity and Wi-Fi coverage.
- Hub-based smart lights have advanced features (motion/light detection, integration with other smart devices) and little dependency on the internet or Wi-Fi coverage as settings are stored in the hub and they run on their own network. However, they are expensive as you also need to invest in a hub.
- Different lighting effects like wall washing, spotlighting or perimeter lighting can dramatically enhance the look of a room. So consider these when planning your home lighting scheme.
Have questions or queries?
If you have any questions, feel free to mention it in the comments section at the end of this page; I will do my best to answer them. Please allow a few days for me to respond. If I (or any other reader) can answer it, then good. If not, atleast it will be something for the next reader to keep in mind. In case you have any learnings or experience to share, do mention it there for the benefit of other readers.
Lights and fans are often bought together. If you are particularly looking for silent fans than consume lesser power, do check my post on how to select the right ceiling fan.
I have also written a bunch of posts on home appliances in case you are looking to buy a new washing machine, refrigerator, microwave, kitchen chimney, hob, exhaust fan, etc.
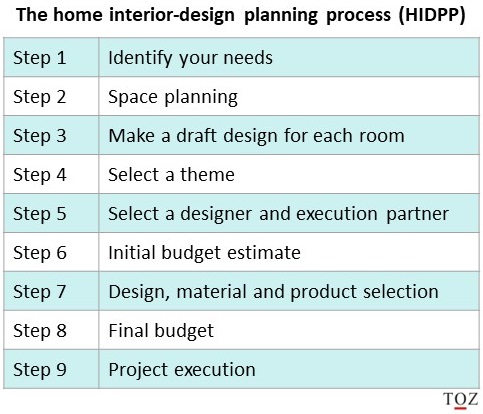
If you are planning to get your home interiors done, I’d suggest going through the home interior design planning process (HIDPP), where I detail out how to go about planning the interior design of your house from a layman’s perspective. It’s a systematic approach that ensures you’ve asked the right questions, assessed your needs, understood the pros and cons of different options, budgeted prudently and designed your house in a way that’s optimally suited to your needs.
Here are the links to the respective posts:
Share this post:


Hello Pradip,
thanks for this amazing article crisply explaining the lightning design. It has helped me understand a lot regarding my lighting requirements. I wanted to understand more about the hub based smart lighting system that you have opted for. Can you provide more details on it like the brands, what to look out for and setup guidance. It would be helpful if you could share some guiding articles regarding it.
There are several brands working in this space – Philips, Lifx, Ikea, Samsung etc., each with their own ecosystem. However, a new common standard called Matter has now been released that makes smart home devices interoperable across brands. Over 500 tech companies have taken its membership.
Back when I bought mine, there was only Philips and Ikea in India. I went with Philips as it was more stable. Installation is fairly simple; you just need to follow the instructions mentioned. Physical installation is the same as traditional lights; they don’t need any special holders or anything.
One suggestion I would have is, to not buy all your lights in one go. Start with just the hub and the most necessary lights for all rooms and you can keep adding lights/sensors over time as and when needed.
The hub itself is quite costly. So from a cost perspective, it makes sense to go for a hub-based system if you use it across your home and not just one or two rooms.
From my personal experience, I feel white ambience lights make the most sense for daily usage. (The colour varies between cool daylight and yellow). You will rarely use the other colours like green, purple, red etc., unless you host parties often.
Pradip
Thanks a lot for putting together this comprehensives article backed with your personal experience. You rock!
Thanks Ajay 🙂