
1. Introduction
This post takes a detailed look at different aspects you must consider when designing your kitchen, and optimally utilising every bit of available space to meet your needs and preferences. It explores 2 areas:
- Design and material considerations for different components of a kitchen (cabinets, shutters, drawers, countertop, splashback, fittings, sink, lighting)
- A structured approach to designing your kitchen
It is said that the kitchen is the heart of any home. And in many ways, it’s true, given that it is the one room that can never be shut down. You can close down other rooms for days together for re-designing, re-organising or cleaning, but not the kitchen. You build it once, you build it well, and it lasts for years.
2. Why kitchen design requires special attention
There are some qualities of the kitchen that make it unique, and hence we need to take special care when designing this space:
- It can’t be shut for long
- It’s a heavy-usage area and can potentially face rough usage from different family members and house-helpers
- Moisture levels are high
- Surfaces are also exposed to harsh conditions of heat, oils, masalas that further combine to form grime. Grime is not only difficult to clean, but can also be corrosive if left as-is for too long. (I’ll control my temptation to get into the chemistry behind this, but if you remember hydrolysis from your 10th standard, you know what I mean).
- While everyone would like a kitchen that looks great, it’s the one place where functionality takes precedence over looks.
The pain of an inconvenient kitchen can never be compensated by its good looks.
3. Design and material considerations for different components of a kitchen
3.1 Storage cabinets
3.1.1 Bottom cabinet design (below the countertop)
- A countertop depth of atleast 2 feet is necessary for cooking comfortably. Consequently, the bottom cabinets are an inch or two lesser than that; this ensures that you don’t injure yourself by brushing against the handles.
- Try to have large shelves and drawers instead of small ones – they not only give you ease of access, but also give you flexibility in terms of what you can keep in them.
3.1.1.1 Drawers
Drawers are ideal for the lower half of the bottom cabinets as they provide easy access to the deeper end.
Kitchen drawers are known to malfunction after a few years as tiny particles of oil and grime in the kitchen environment tend to settle in the channel and jam the mechanism. So it’s crucial that you select the right channel for your drawers.
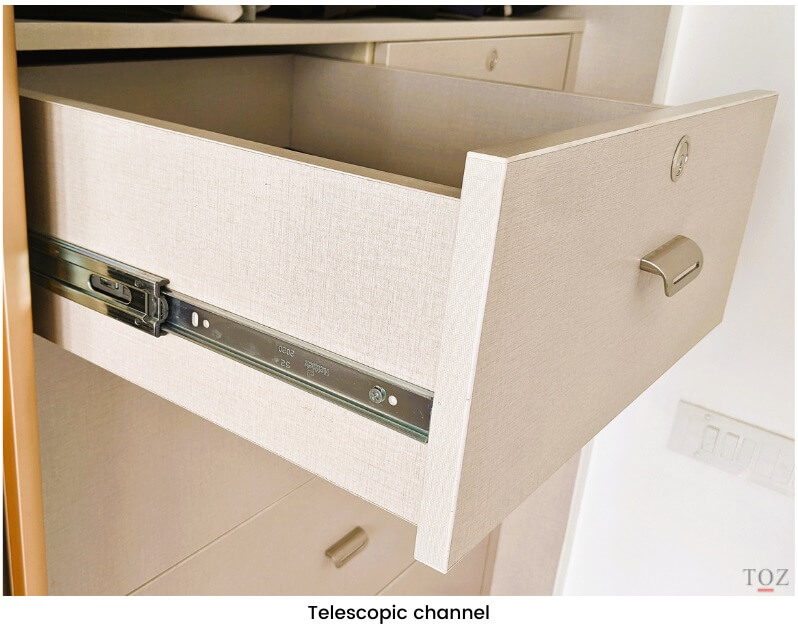
There are mainly 3 types of channels:
Telescopic channels
Telescopic channels have been around for ages and are the most inexpensive. They run along the sides of the drawers. However, owing to their open design, they are most prone to getting jammed due to oil/grime settling in. They are better suited for wardrobes and bedrooms. I wouldn’t recommend using them in the kitchen.
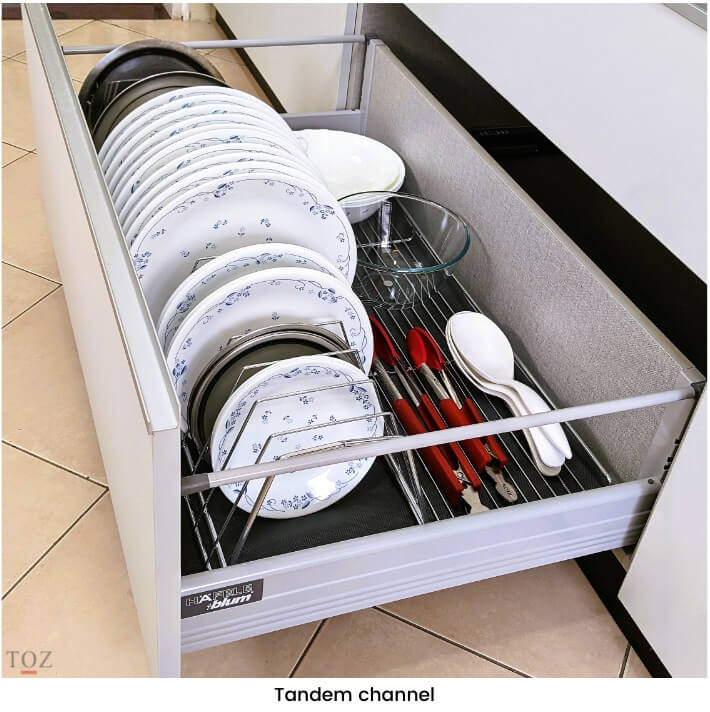
Tandem channels
Tandem channels also run along the sides of the drawer, but have a concealed design, thus protecting the mechanism from getting damaged. They have high load-carrying capacity that can go as high as 70kgs and are ideally suited for large drawers meant for keeping heavy kitchen items. They are expensive, run flawlessly for years and worth the investment. Tandem channels may be called by different names by different brands, but what’s important here is to select one that has a concealed design.
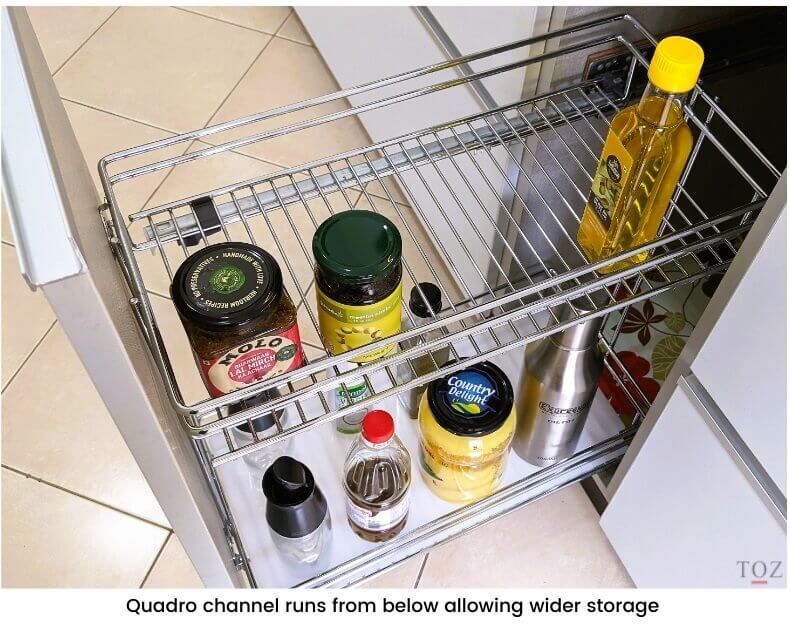
Quadro channels
Unlike telescopic and tandem channels, Quadro channels run under the drawer. This makes them a bit more space efficient as it allows for a marginally wider drawer. They are commonly used in oil pullouts as well as other kitchen drawers. They have a high load carrying capacity and concealed design, thereby making them durable, and consequently, quite expensive. Quadro channels may be called by different names by different brands, but what’s important here is to select one that has a concealed design.
Personal experience:
I opted for a telescopic channel of a very good brand for the oil-pullout in my parent’s house. It worked fine for the first 4 years, but started getting stuck after that. There was no quality issue in the channel; it’s just that the open design of these channels allows dust and grime to settle in over time. I’ve never faced any issues with tandem and Quadro channels. They are expensive, but worth it in the long run.
3.1.2 Wall cabinet design (above the countertop)
There are 2 types of shutters for wall cabinets:
a) Shutter hinged on the side
These are the normal hinged shutters that are hinged on the sides of the cabinet. They are relatively inexpensive and durable. Moreover, this design also gives you the option of having 2 or 3 shelves as per your need. If you want, you could have adjustable shelves as well.
b) Shutter hinged on top
These are shutters that are hinged on top and the shutter opens upwards (like the dickey/trunk of a hatchback car). This design allows for easier access from the sides as the open shutter doesn’t come in the way. These shutters also look quite stylish and you can spruce it up further having frosted glass shutters and lights inside. However, this design is a little more complex as a hydraulic mechanism is needed to keep the shutter open. These hinges come at quite a premium if you buy the ones that last. If you go for separate boxes for each shutter, you will be limited to 2 shelves. And in case you opt for a single shutter (so you can have 3 shelves), the cost of the hydraulic hinge goes up further, as it now needs to support a larger and heavier shutter. In my view, though these shutters look good, they add unnecessary complexity and little functional value.
Try and limit the depth of wall cabinets to 13-15 inches, else they feel too close to your face, which can be quite irritating while cooking.
You must consider the dimensions of your chimney and hob as well when designing your kitchen cabinets. A larger chimney would translate to a smaller cabinet space, so you need to balance the trade-off. I’ve written a separate post on selecting the right chimney, hob and exhaust fan for your kitchen that explores the key factors to keep in mind when buying them.
3.1.3 Cabinet carcass material
The carcass is the cabinet box without the shutter. There are primarily 3 types of material used for making cabinet carcasses:
Plywood
- Normal – In case you use normal plywood, make sure it has a waterproof coating (like PU) or laminate on top of it.
- BWR – Boiling water-resistant plywood is resistant to water for 24 hrs.
- BWP – Boiling water proof plywood is resistant to water for 48 hrs. Its costlier than BWR plywood.
If you have the budget for it, try to opt for materials that can handle moisture
WPC sheet
WPC (Wood plastic composite) is a mix of wood fibres, wood flour and thermoplastics. It is an expensive material that is fireproof and waterproof. However, it has a lower load carrying capacity than plywood.
Make sure to use WPC sheet or BWP plywood for the cabinets near the kitchen sink, given the higher levels of moisture there. I wouldn’t suggest compromising on this.
Fibreboard (HDF / MDF)
Fibreboard is made by mixing wood fibres, wax and resins and compressing them under high heat to create sheets having a very smooth finish. As they are machine-made, they come in a wide variety of designs and finishes and are visually very appealing. HDF (High density fibreboard) is more durable and expensive than MDF (medium density fibreboard). Fibreboards aren’t good at handling moisture, so they need a layer of waterproof coating. They are also not durable and unable to handle indian kitchen conditions for long. With frequent usage of the cabinets, the wood fibres also tend to disintegrate near the screws, the hinges loosen and cannot be fixed back again. I don’t recommend using fibreboard anywhere in the kitchen.
Personal experience:
We had used MDF for our kitchen cabinets in our earlier house and repented 2 years later when they just started falling apart. If you are keen on fibreboard, stick to HDF.
3.1.4 Cabinet shutter material
- Plywood and fibreboard are commonly used for cabinet shutters. Wood is also used occasionally, but is quite expensive. There are plenty of coatings you could have for the shutters. There’s laminate, acrylic, polygloss, lacquer, PU (polyurethane); the list is endless with something new getting added every few years. PU is transparent and is generally used as a protective waterproof layer on top of other coatings.
While choosing the shutter material focus on ‘cleanability’ and ‘scratchability’. It should be easy to clean and not get scratched easily while you are cleaning it.
- Laminates are the best for kitchen – they are inexpensive, durable, easy to clean and don’t scratch easily. Vendors will try to coax you into buying other rather expensive and visually appealing materials. Some will interchangeably use the phrases ‘scratch-resistant’ and ‘scratch-proof’ while others will tell you how easy it is to get re-polishing done (that’s another future cost). Don’t fall for it, stay alert and objective about the ease of cleaning and scratchability.
Remember, if someone says that you need to use a soft moist cloth to clean a surface, it definitely scratches easily.
- For any material, keep in mind that scratches are more easily visible on a glossy-finished surface than a matt-finished one. This is true even for laminates.
Avoid shutter designs that have grooves; it can be quite a pain to clean them.
3.1.5 Cabinet and drawer handles
There are mainly 2 types of handles to consider:
- Profile handles are fixed inside a groove on the top/bottom of the shutter/drawer. They merge seamlessly with the shutter/drawer and hence safer for kids as there are almost no projections. But these handles collect dust over time, so you need to clean them regularly.
- Normal handles, on the other hand, are smaller and easier to clean. Handles come in a wide range of qualities, designs and prices, so I cannot say that profile handles are costlier/cheaper than normal handles. It all depends on the specific one you choose.
3.1.6 Masala / Spice rack
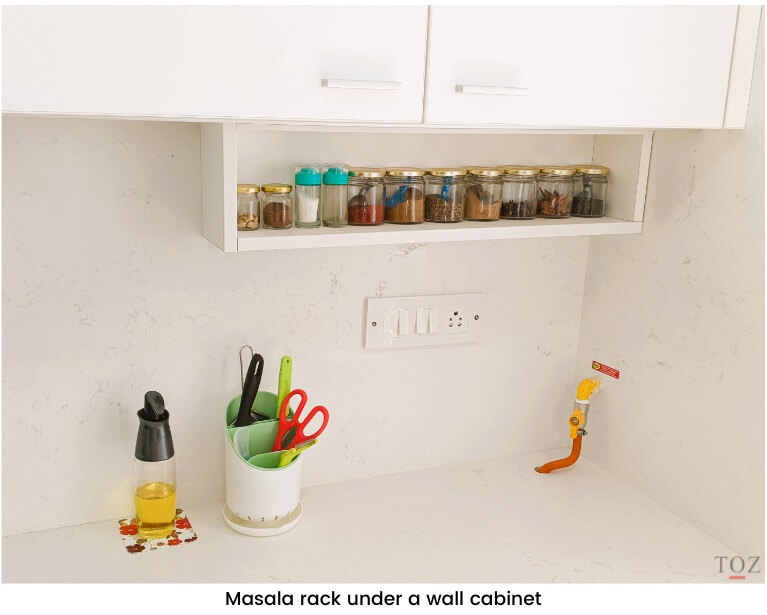
I don’t advocate open shelves in the kitchen as they are a pain to clean. You can install the best chimney and exhaust fans out there, but grease will somehow manage to settle in the open areas of the kitchen. However, we need to strike a balance. From a convenience standpoint, it can be quite irritating to repeatedly open a shutter/drawer to access frequently used items like masalas. To address this, you could consider having a small masala rack fixed right below the wall cabinets that are within an arm’s reach. Just make sure it is a minimum of 6 inches from the edge of the gas stove, else you will have to regularly clean the oil droplets that splash off the pan while cooking. Another option could be to buy a masala box (or masala dani) that you take out from the cabinet/drawer only during cooking.
3.2 Kitchen fittings
Kitchen fittings are designed to add convenience, but they may or may not be helpful based on your cooking habits and preferences. Pima-facie, a lot of them make sense, but you may later realise it doesn’t integrate to the way you run your kitchen. And since a lot of them can be quite expensive, buy them only after giving it a good thought and you’re convinced that you need it.
There are plenty of kitchen fittings out there from a host of companies. I’ll walk through the 3 most common ones:
3.2.1 Oil-pullout
An oil-rack or oil-pullout is a very useful kitchen fitting for storing oil, ghee and pickles. It can also double up as a masala rack, in which case you should look for designs that have 3 rows in it.
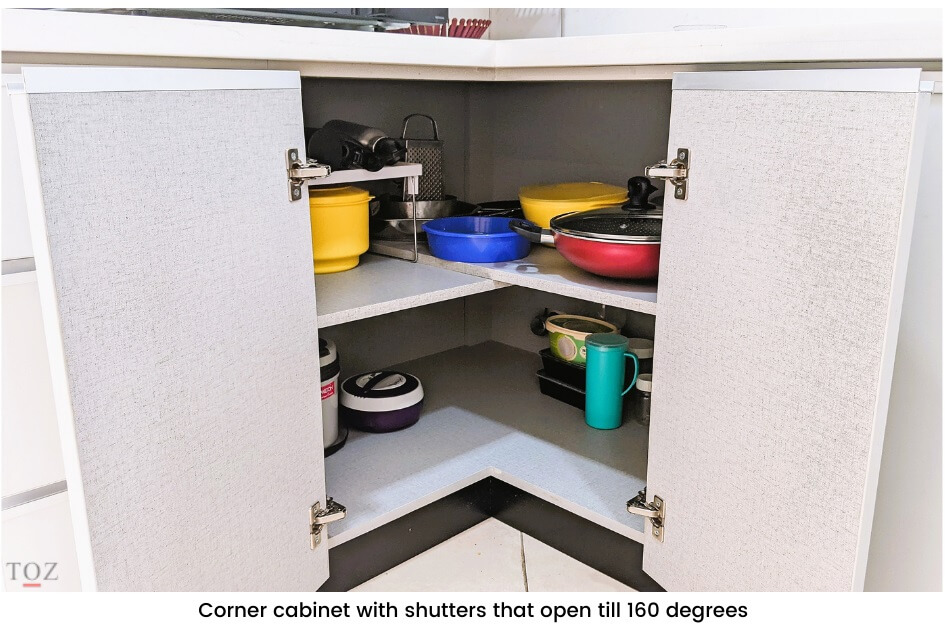
3.2.2 Magic corner
A magic corner is quite an innovative mechanism that allows easy access to the corner areas below the countertop. It comes in 3-4 types of designs. It is expensive and every store will try to sell you one. On the first look it is quite impressive, but as you delve deeper you will realise that it is actually inefficient in terms of space utilisation and has a limited load-carrying capacity. It makes sense to buy only if you will be frequently accessing the corner and the storage items aren’t too heavy.
Personal experience:
I did consider a magic corner for my kitchen initially. But I reshuffled my overall kitchen storage so as to keep only occasionally used items in the corner, thus making a magic corner redundant. I opted for simple shelves instead, with shutters that open till 160 degrees (as opposed to the normal 90 degrees) that give me easy access into the corner space.
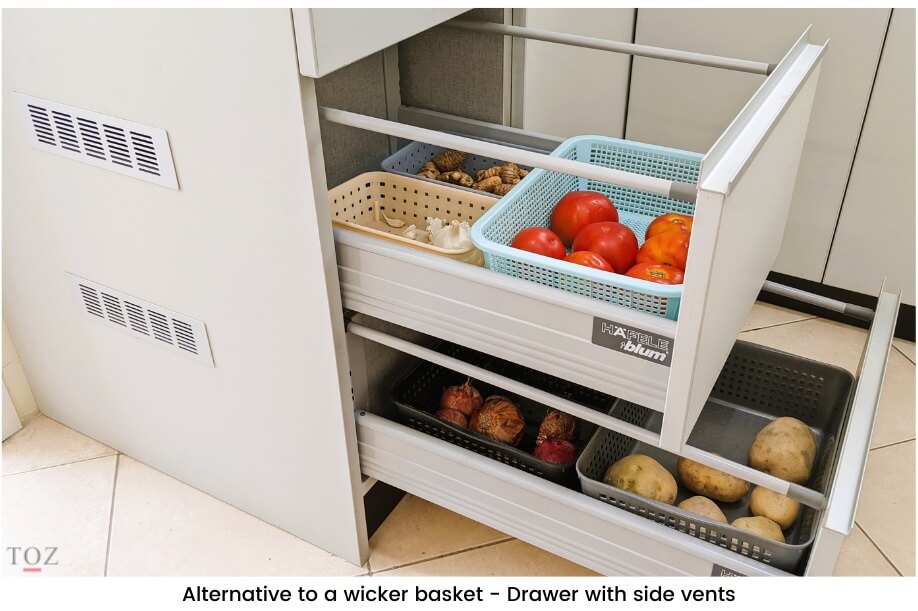
3.2.3 Wicker basket
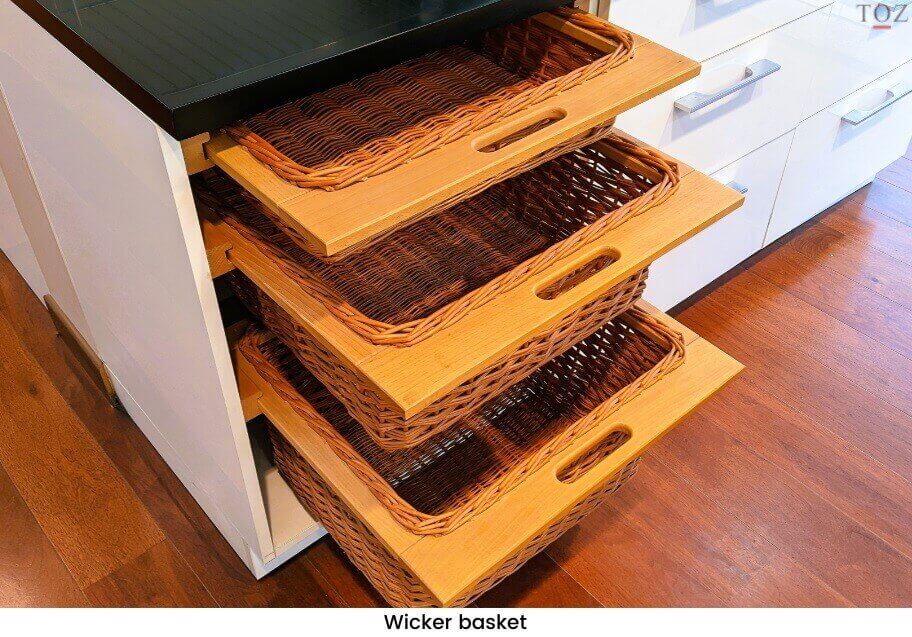
A wicker basket is meant for storing vegetables that need to be kept in the open (for example, potatoes, onions, ginger, garlic). It slides out like a drawer and adds to a lot of convenience and visual appeal to your kitchen. It is quite a bulky fitting that makes sense if you have a large family or buy several kgs of potatoes/onions in one go. Cleaning it is a bit of a challenge as dust and oil from the environment settles into the tiny grooves of the wicker basket.
An alternative to the wicker basket could be to keep potatoes/onions in a drawer so as to minimise the dust/oil that settles in. Drawers are easier to clean compared to wicker baskets. For air-circulation you could have tiny holes or a side vent.
3.3 Countertop
There are mainly 3 types of materials used for countertops:
3.3.1 Granite
Granite is the most preferred material for countertops. It is a naturally occurring rock that is extremely durable, heat-resistant and easy to clean. It comes in a variety of colours and has unique natural striations in its texture based on where it has been mined from. Granite also does not discolour when exposed to the sun. However, some coloured granites have a tendency to allow water to seep through it. Black granite is the least prone to water seepage and hence is the most widely-used countertop material. Cost of granite varies based on its properties, which in turn depends on where it has been mined from.
3.3.2 Quartz
Quartz or quartzite is an engineered stone that has become quite popular in the last few years. It is manufactured by combining powdered quartz with resins and polymers under high heat and pressure. It is durable and resistant to water-seepage. As it is a manufactured product, it comes in a wider range of colours and designs than granite. However, it doesn’t match granite when it comes to handling high levels of heat. So you shouldn’t place hot pots from the gas stove directly on the countertop, but use a heatpad or trivet instead. Quartz also tends to discolour over the years if exposed to UV rays of direct sunlight. So, if a part of your countertop gets direct sunlight, then you will see the colour difference over the years, especially if it is a light colour. Quartz makes sense if you want uniformity of colour or keen on a specific look/colour that is not possible with granite. Though granite and quartz come in a wide range of prices, on an average, quartz is costlier than granite.
Consider doing a stain test on the quartz slab before buying it, as there is a rare chance that a quartz slab may get stained easily.
It is normal in mass scale manufacturing to have 1% of the slabs develop microscopic bubbles during the manufacturing process. Oils and masalas get stuck in it easily and it can be a real pain to clean it frequently, sometimes with special cleaning agents. So it’s better to be safe than sorry. For the stain test, take a small piece of quartz home, put a small patches of masalas and oil on it, leave it overnight and see if it can be wiped out easily next morning. Some sellers may allow you to do the test in their store/warehouse as well.
3.3.3 Caesarstone
This is just expensive quartz imported from a different country. I don’t see much of a point opting for this, unless you are willing to shell out extra for achieving a very specific look in your kitchen.
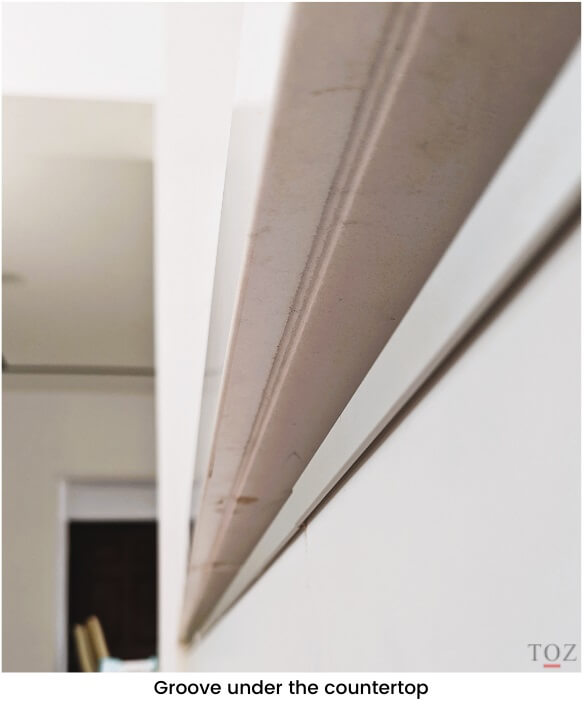
Irrespective of which material you choose, you must ensure that there is a groove on the underside of the counter top that runs along the edge. This is to prevent water and other liquids from trickling down from the top of the countertop and reaching the cabinets.
3.4 Splashback
This is the wall opposite to you behind the countertop. They are typically covered with ceramic tiles (also called dado tiles). Cleaning dado tiles is quite tedious as grime tends to get stuck in the grooves between the tiles. There are 3 ways to address this:
- Having larger dado tiles – This will lead to having lesser grooves overall, making it easier to clean.
- Having a quartz/granite slab as a backsplash – A single large slab completely gets rid of all the grooves. It also imparts a sense of continuity from the countertop to the splashback that looks quite appealing.
- Having a glass splashback – A single piece of glass gets rids of all the grooves. Glass not only gives a unique look and a range of colour possibilities, but is also way cheaper than quartz or granite. And don’t worry about it breaking, the glass used for a backsplash is toughened glass that doesn’t break with normal kitchen use. Also, you will notice that a backsplash rarely gets hit with anything hard; it is mostly oil, water and food splashes.
3.5 Sink
Steel sinks have been around since time immemorial. They are durable and provide good value for money. In the recent years, several brands have come up with quartz/granite sinks. They look way better than the traditional steel sinks and also have a mild cushioning effect to reduce noise and the chances of glass utensils breaking in case they slip from your hand. Unfortunately, the water we get in many Indian cities has high salt content that leave stubborn white-coloured stains, making the sink look quite ugly. Hence, I recommend going with steel sinks. Some prefer the look of the brushed finish steel over the shiny one; but both are equally good from a quality standpoint.
If you have enough space for a sink in the utility, you could have a larger sink with a drainboard there and a smaller one without a drainboard in the kitchen. This would give you more countertop space and also keep the kitchen clear of dirty dishes.
Personal experience:
Avoid keeping the garbage bin under the sink in the kitchen, as they will inevitably attract pests like cockroaches. It’s better to keep garbage bins in the utility area where there is some air circulation. In fact, if you can make it a habit to leave the garbage bin in an open balcony every night, you will practically rid kitchen of any pests. We’ve been doing this for the last 15 years and have never had any pests in the kitchen in spite of never getting pest-control done.
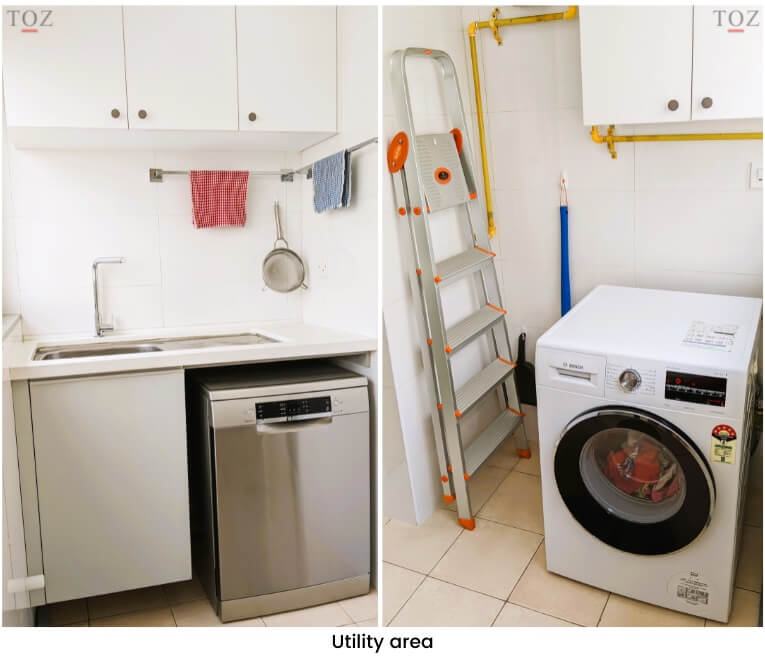
3.6 Utility area
The utility room/area is an often-ignored space, but if designed well, you could get a lot done there. It is typically home to a sink, washing machine, dishwasher (if it’s not in your kitchen) and garbage bins. You could have a few hooks to hang brooms and mops. Try to keep some storage space (a small wall cabinet) for detergents, scrubbers, descalers and other cleaning items. If your utility room is small, I’d recommend having tiles upto a height of 5 feet atleast; it’s just easier to keep it clean. The utility area is also a good place to keep a ladder – always have one at home, it’s a small price to pay for your own safety.
3.7 Kitchen lighting
Kitchen-work often involves a lot of detailing, making it necessary to have bright ambient lighting. So it’s better to stick with white light and avoid warm white lights. Avoid having the ambient light source behind you when you are standing in front of your hob/cooktop; it will create shadows.
A single source of light, irrespective of how bright it is, will always create shadows, thereby making some tasks difficult. It’s better to have distributed lighting.
Ideally you should have atleast 2 or more lights on the ceiling placed in a way that you have good illumination in all the work-areas of your kitchen with minimal shadows. As for the lighting fixtures, keep it simple and functional. Ceiling lights don’t get dirty and maintain their brightness throughout their life.
If you’re planning to have counter-top lights in the kitchen, you might want to consider using a different colour than that on the wall/ceiling, i.e. if you have cool daylight as the ambient light, then warm white countertop lights would complement it quite well.
As home lighting is an extensive subject, I have written a dedicated post on this topic where I look at lighting layers, wattage, placement, colour temperature, smart lighting and lighting effects. If you are interested, you can check out my practical guide to home lighting design.
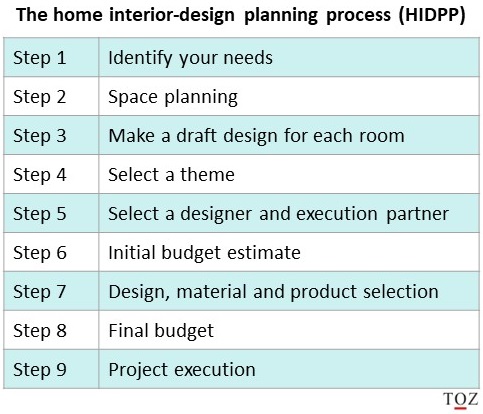
4. A structured approach to designing your kitchen
4.1 Understand your storage needs
This is the most important step as it will dictate a lot of your options going forward. Don’t think about your kitchen design or feasibility at this point; just focus on your storage needs. It’s a detailed exercise, so don’t try to do it all in your mind. You’ll also keep coming back to this later, so it’s best to write it down.
4.1.1 Identify storage groups

Start with making an exhaustive list of all your storage groups – pans, pots, plates, bowls, cups, cutlery, pulses, grains, pantry, snacks, masalas, tools, etc. The list may sound obvious, and you may feel that you know it like the back of your hand, but trust me, you will be surprised by the insights you will come up with as you think through this step. Moreover, it ensures that you subsequently allocate space for everything in your kitchen and don’t end up using precious countertop space for storage. Do this activity thoroughly and be as detailed as possible. For instance, list down all the masalas, dals and pulses or write down the number of plates, cups, bowls etc. This detailing will be useful later.
4.1.2 Grouping and linking
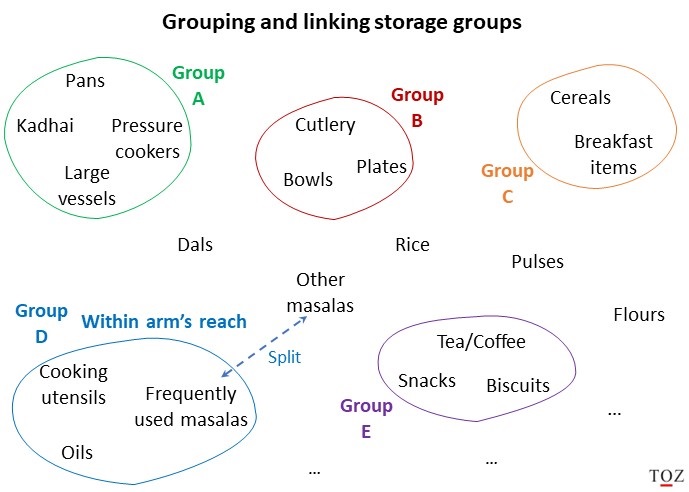
- Identify groups that are logically related. For example, it makes sense to have tea, coffee, biscuits, snacks together. Also identify groups you would consider together. For instance, you might want to look at all the dals in one go before deciding which one you will cook.
- Since you have limited space that’s within an arm’s reach from the cooking area, it is important that you utilise that space optimally. This might mean you would have to split certain groups. For instance, you might need to pick which masalas you use most frequently and only keep those close to the hob or cooktop.
4.1.3 Estimate the space needed (account for future expansion)
- Consider how much space you would need for these groups as of today considering how you store them
- Check if there are other efficient ways to store these items. For instance, you could switch to space saving containers for some of your items. A tall and thin container that utilises more of the shelf height would free up space to keep more containers in a shelf. Similarly, stackable containers allow for more efficient use of storage space.
- Now estimate the space needed for each group while accounting for additional space for future needs. For example, you may want to keep more options of dals, pulses, snacks.
4.2 Create kitchen design options
This is a rather detailed exercise that depends on various factors like the shape of your kitchen, window placement, water supply, drainage etc. While you could give this exercise to your designer or a modular kitchen company, I’d suggest you give it a go yourself atleast twice before you approach anyone. You don’t need to be very accurate; the objective of this exercise is to get a sense of what is feasible and what’s not, and get a thorough understanding of your constraints. It will make you clearer about your needs, force you to prioritise them further and make you better equipped to discuss design options with a vendor at a later point.
Open surfaces in the kitchen tend to accumulate oil and grime. So try to avoid permanently stationing things on the countertop. It also allows for a more comfortable cooking experience. If you have the space, try to keep even small appliances like toaster/mixer in a cabinet.
There are a few key principles you must keep in mind when creating design options. For each design option ensure:
- that you allocate space for all the storage groups.
- there is easy accessibility between the hob, refrigerator and sink.
- atleast 2 feet of space beside the sink.
- there is a good amount of space (2-3 feet) on each side of the hob. The more space the better.
- there is enough space and electrical points for kitchen appliances like mixer, chimney, hob, juicer, toaster, microwave, refrigerator, water purifier etc. Keep a couple of extra plug points for the future.
- the corner areas are easily accessible.
- the lowest shelves of the bottom cabinets are easily accessible. Alternately, a drawer can provide easier access to the deeper end.
- that you consider the direction in which the cabinet doors open so that they don’t restrict each other.
- that you keep in mind the design considerations for each part of the kitchen that I talked about in the earlier part of this post.
Maximise countertop space near the hob. It is far more convenient to work in one place than having to move back and forth between 2 areas of the kitchen.
5. Conclusion
Designing a kitchen is no easy task that can take weeks to accomplish – you have a million things to take into account and balancing all of them can be difficult. Advancements in the kitchen industry, though valuable, have further added to the complexity of this exercise with more options to choose from. But good planning is the key and it’s important to do your homework in advance. In fact, I’d suggest doing this exercise over several days/weeks and not try to finish it in one go – looking at things with a fresh mind always helps. I hope this post has helped you think through your kitchen needs in more detail and you feel better equipped to design a kitchen that’s convenient, durable and optimally suited for your needs.
Have questions or queries?
If you have any questions, feel free to mention it in the comments section at the end of this page; I will do my best to answer them. Please allow a few days for me to respond. If I (or any other reader) can answer it, then good. If not, atleast it will be something for the next reader to keep in mind. In case you have any learnings or experience to share, do mention it there for the benefit of other readers.
Always consider the dimensions of your existing home appliances when designing your kitchen. In case you are planning to buy new ones you can refer to my posts on:
- How to select the right chimney, hob and exhaust fan for the kitchen
- Choosing between a microwave, OTG and convection microwave oven
- A practical guide to buying a refrigerator
- Selecting the right washing machine – Pros and cons of different washing machines and factors to keep in mind when buying one
In case you are planning to get your wardrobes done along with your kitchen, you could refer to my post on the factors to consider when designing or selecting a wardrobe. This post delves into factors like build material options, pros and cons of different types of shutters, designing wardrobe internals (shelves, drawers, fittings), buying readymade versus getting it custom-made.
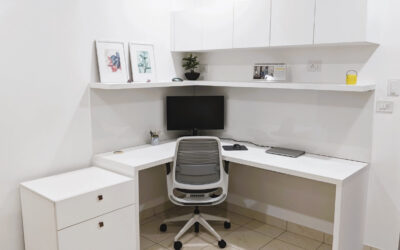
In case you are planning to get the overall interiors of your home done, then I’d suggested going through the home interior design planning process (HIDPP), where I detail out how to go about planning the interior design of your house from a layman’s perspective. It’s a systematic approach to ensure you’ve asked the right questions, assessed your needs, understood the pros and cons of different alternatives, budgeted prudently and designed your house in a way that’s optimally serves your needs.
Here are the links to the respective posts:
Share this post:


How about using aluminium for carcass with ACP for shutter and quadro channels for SS racks?
ACP shutters are a good choice as they are durable.
You can use quadro channels for the SS racks as long as they have the load bearing capacity that you need. Last I checked, the tandem channels had models with higher load bearing capacity of about 40kgs, which was higher than that of the quadro channels.
I am not sure about aluminium carcass though; in fact, I’ve not come across anyone using them. My concern with aluminium would probably be its lower strength and tendency to get corroded/oxidised over time.
I found you blog very well thought out and gave good suggestions.
Thanks Anjali 🙂